My party traveled to the Isle of the Dead, which I first got directions to back in Narawn.

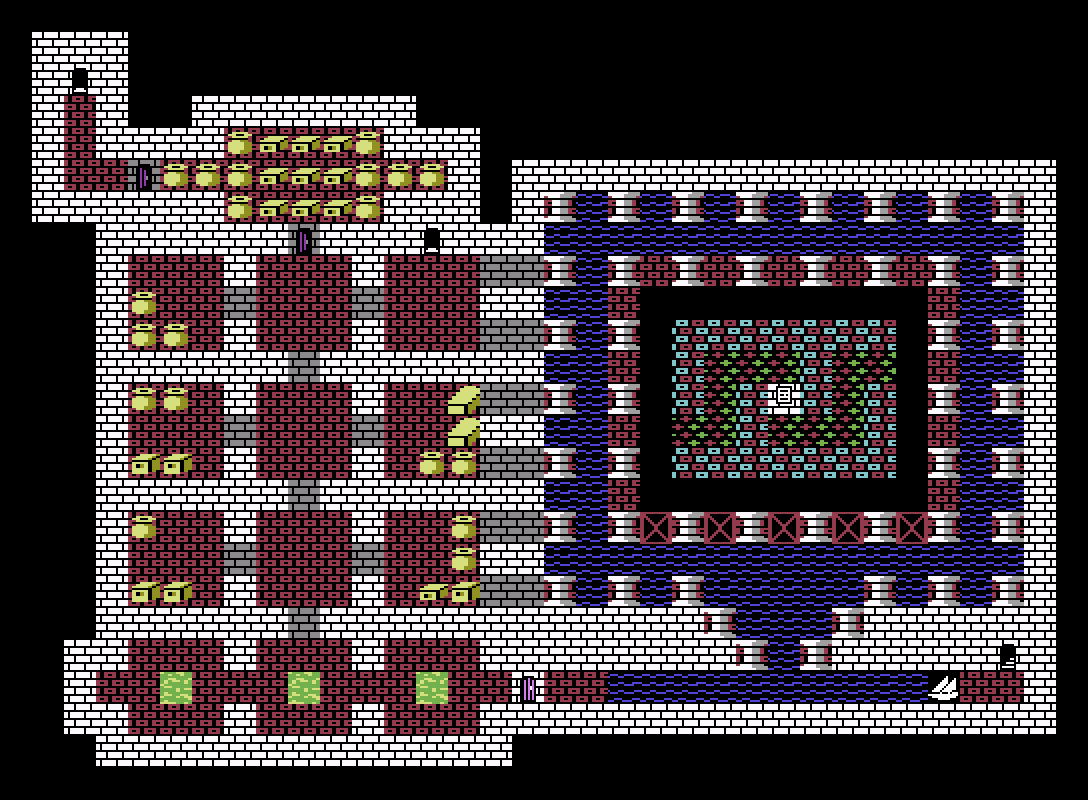
There's only one reason to come here--to visit the Pyramid of the Old ones, my single least favorite dungeon in the game. There's another awful dungeon I haven't visited yet that comes close, but this one takes the cake. The Pyramid is a ground-floor "indoor" area, with a five-level dungeon beneath it. The word is at the bottom.
 |
| Make absolutely sure to cast KAERU before going into this dungeon. |
 |
| Ugh... |
As you can see from the map of the ground floor above, the Pyramid is one enormous maze. There's not a complicated trick or strategy to the dungeon other than to painstakingly map everything as you go. Due to the limited view window, and the walls that block the party's line of vision, it is extraordinarily easy to get lost here.
Immediately upon entry I was ambushed by a group of Sphinxes. Sphinxes aren't that big of a deal, but I also saw that instead of an exit, there was a sign behind me.
 |
| That's just great... |
 |
| Pretty sure this didn't happen in the Apple version. |

Like the south end, the west end is blocked off from the rest of the pyramid/ To get anywhere in this dungeon, you have to enter through the north entrance. I did that and made my way through the maze. There were a few empty treasure chambers along the way and many, many Minotaurs, which at this stage posed no threat to my party at all.
 |
| So I guess Yorik is a grave robber? |
 |
| For you, it'll be in a casket. |
 |
| These are actually directions to a new continent I have yet to visit. |
 |
| This seems like such an obvious exit, doesn't it? |
Down to the first level underneath the pyramid. Now the pyramid becomes a proper dungeon--you need light to proceed, and more importantly, you can pitch camp if you need to.

This floor is bizarre from a mechanics perspective. When I explored the Troll Hole and explained how dungeons are constructed in Deathlord, I mentioned that each floor of the dungeon was actually a 64 x 64 area cut up into four levels that were 32 x 32 tiles each. This dungeon floor no exception--but the four levels are all connected. The northwest quadrant is technically level 1, the northeast level 2, the southwest level 3, and the southeast level 4.
For the purposes of spells, this floor is also four levels. If you cast UNPAN in the northwest quadrant, down 3 "levels", for example, you'll end up in the southeast quadrant. Strangely enough there's even a chute trap in the southwest corner that will dump you into the southeast quadrant of the same floor. It's very confusing.
Still, this floor is not as bad as the previous one. The four quadrants are more self-contained, and the interspersed darkness tiles make it much easier to regain your bearings if you get lost. Of course, you'll still need to map the area very carefully.
 |
| I'm going to say the devs knew exactly what they were doing in making this dungeon so painful. |
 |
| I guess this is as far as Yorik got... |
The way to the next level is in the southeast quadrant of the level. It's through a chute behind a hidden door.

And now we come to the reason I hate this dungeon so much. Level 2 is an enormous illusory wall maze. This is even worse than that stupid door maze in the door dungeon. At least that left a trail of open doors as you proceeded through it. Here if you lose your bearings you're forced to slam up against walls repeatedly in a vain hope of escaping.
Also, this level is why I mentioned before that you really want to have exit insurance in the form of KAERU or UNPAN before heading into this dungeon. Notice there's no staircase up? Once you reach this level you're stuck here. There's one teleport deeper in the dungeon that can get you out, but it's hard to find.
 |
| This screenshot is level 2 in a nutshell. |
 |
| Level 3 |
 |
| Level 4 |
Because of the way level 3 and level 4 are set up, they go hand in hand. Level 3 is full of chutes that drop you to level 4. Level 4 is totally open, but there are several teleport tiles that send you back to earlier levels.
The way out is through the teleporter on Level 4 labeled "5B". However, this teleporter is blocked by two other teleporters that send you back to level 3. The only way to get access is to teleport in it from level 3. Of course to get to the teleport on level 3, you have to navigate a very specific route to avoid all the chute traps.
If that sounds confusing, it is--even a skilled mapper is going to get stuck a lot on these levels, falling down chutes and teleporting back to earlier parts of the dungeon (and having to do the illusory wall maze again). All the while, you're getting attacked by highish-level monsters, mostly giants of one sort or another. The theme of these levels is "constantly falling down pits, then going back up the stairs to try again." It kind of feels like that old board game Labyrinth in video game form. Except you don't know where the holes are. And every once in a while your ball is sent back to the start of the board for no reason.

Despite being a darkness maze, level 5 is probably the simplest of the levels of the Pyramid to navigate. The one teleport in the middle of the level might throw you for a loop, but aside from that it's not all that awful--at least not compared to the rest of this dungeon.
 |
| "Lust" in Japanese |
Finally I got to the Word. Rather than try to find my way out of the dungeon I just teleported out. Even with maps it takes far too long to get out using conventional methods.
Given that I "cheated" with this dungeon and made frequent references to my maps, it really wasn't so bad to get in, get the word, and get out. But it's hard to understate how awful this dungeon is when you're going in blind. I enjoy mapping dungeons a lot, but the Pyramid is too much even for me. And the endless frustration of smacking against walls in the illusory-wall maze, or falling down a pit for the thousandth time on the 3rd floor, is hard to bear. Tedium aside, the design of this dungeon is just lazy; it's nothing but a maze, and not even a really clever one.
Now I had all 7 words and all 6 items--everything I needed to take on the Deathlord himself. However at my party's current levels, I don't think I'd survive the Deathlord's dungeon. I was also low on gold, with the level-ups I gained from Telegrond draining over half my funds. So I decided to go to another frustrating dungeon that I briefly touched upon when exploring Kodan, the pirates' den in Wakiza.
On the way back to Kodan I got lost and ran into another "continent."
This is one of two "continents" that consist entirely of empty islands that have nothing. Here's a map of the other:
I don't know whether the creators intended for these islands to have anything of significance and never put them in, or if they're just for flavor. Because they take up so little space in their own sector they're very hard to run into--you're liable to sail right past them. They do, however, provide a good indication of where you are...providing you have access to the full map.
Back to Kodan and healing up I visited Wakiza to go to the pirates' den.
 |
| The entrance is hidden behind illusory walls |
As dungeons go, the pirate caves aren't that bad compared to a lot of others. It's an 8-floor dungeon; the top 4 floors are actually pretty good, but the bottom 4 floors are a frustrating maze. The pirate caves are mostly bad by virtue of their location. One would think that, being on the first continent, they would be a reasonably safe place to explore, at least compared to other dungeons in the further reaches of the game. The pacing is also really off--it lulls you in with a sense of security by presenting a balanced dungeon, and then it dumps you in a terrible maze with some of the toughest monsters in the game. You're liable to wander in here well before you're ready to.

The first floor of the pirate cave starts innocently enough--a sprawling, swampy cave system much like many other dungeons in the game. The encounter rate here is quite low, and none of the monsters are particularly challenging.
 |
| My party could kill these guys with a sneeze by this point. |
I waited around just to see what could show up, and it was all very low-level stuff--Obake, Gremlins, Kaibu, Skeletons--that sort of thing. The layout of this level was very simple so I went below.

Level 2 has a higher monster spawn rate than the first level. Since the level is mostly water, there are fewer spots for land monsters to spawn so you'll see them congregating in groups. Mermen spawn here too but not that often. The fights were a little tougher than the previous level with the occasional ogre, but still decidedly low-level fare.
To get from area to area in this dungeon, you have to take the ships that are parked here (or cast UKU, I suppose) or else you're stuck. Frustratingly, there are a few spots where you're forced to disembark into swamp tiles too--1HP at this point was no big deal but it's still not great design.
 |
| Since you can't disembark into another boat, you need to do so in the swamp instead. |
Speaking of poor design, this floor--and this dungeon in general--has a major problem. Should you get stuck and need to disperse your party deep in this dungeon, or teleport out--something you may well have to do, and something I had to do more than once--you could effectively prevent yourself from ever coming back. The ships here stay where you left them, so if you re-enter the dungeon, you may discover that they're on the other side of the "river" and you have no way to get to them.
The third level is the first area in the dungeon that has some actual treasure in it. There's not an enormous amount--maybe a few thousand GP--but it's something. And the monsters still aren't that tough so this is an area a low-level party could feasibly go for some extra money. There's a trap-laden room surrounding a sign, surrounded by both kinds of magic walls.
 |
| Ugh. Well, at least I could use the Crystals instead of trying to go through the Arkhan's Walls. |
With that pointless bit of work done, I looted the remainder of this floor (concealed by both secret doors and illusory walls) and headed down to the next one. Note from the map that there are actually two separate exits to this floor. One is behind illusory walls, whereas the other requires you to search for secret doors to find it. I think this was deliberate--with all the illusory walls, the player might be tricked into not searching for secret doors, and thus wouldn't find the true exit.

Going down the first exit I found, I ended up in a small room with two magic pools. I actually managed to get Frank a point of Dexterity from them--I'd mostly been ignoring the mages when it came to magic pools, so their stats were still mostly low. Searching the area I found a secret door, behind which were several groups of Dark Toshi.
 |
| I guess if you came here at a low level this would be a tough fight. |
Beyond the Dark Toshi was a small treasure chamber. Also one thing of note on this floor are those teleporters marked "A." I'm almost sure they're teleporters on illusory walls but I'm honestly not positive. All I know is that if you try to walk through either the north or south wall on that tile you go nowhere, but don't ram into a wall. It's somewhat odd and I wonder why that was put in here.
I headed back to level 3 and took the other staircase down. You'll note from the map that there are two pathways through this level--one on land and another by the "moat" that surrounds this level. You're far better off using the waterway, as the land pathway is riddled with pit traps. There's also a creative use of teleports here that block the main treasure chamber in this building. The teleports move the party one tile back, giving the illusion of an invisible forcefield.
 |
| Move west as much as you want; you'll just end up in the same place. |
The solution to this puzzle is to jump on a boat, sail east from the position of the ship in the above screenshot, then disembark into the wall. You'll be teleported right into the middle of the treasure chamber. I might note that this is your one shot at getting these chests that doesn't involve high-level magic; once you teleport, you'll leave your ship behind, and blocking the teleport tile.
 |
| Without the use of the UKU spell, there's no easy way to get back to that ship. |
There are some more treasure chambers on this level, but they're a little harder to find. They're behind corridors through illusory walls--and those corridors have teleporters in them, so you might not realize how far you can go.
If this was all that the pirate cave was, I'd call it a decent, or maybe even good dungeon. It's probably just balanced right for a party that's finishing up Kodan for the first time. However this is decidedly not the whole dungeon, and it continues on. It's these upcoming bottom four levels that are killers.

Level 5 is where things get hard. Prior to this point the Pirate Caves fool the player into thinking it's a challenging but doable dungeon for beginners--a, say, level 8-10 party would probably be fine up until this point. But now, the dungeon abruptly turns into a dungeon for advanced characters, with high-level monsters, mazes, and teleport chains.
 |
| Sea Dragons are not monsters low-level parties should be facing. |
Levels 5-8 are one big water maze with teleports. It's full of Sea Dragons, one of the toughest monsters in the game, capable of doing 45+ damage to the whole party when they use their breath weapon. The other monsters that spawn here are not as dangerous, but nearly all of them can inflict status ailments of some sort, mostly poison and paralysis. Your Shisai will run out of power quickly trying to keep up with cures, and there's no safe place to rest.
The first part of the maze requires you to take a series of ships to the first step in the teleport chain, in the middle of the floor. The second step in the chain is also on this floor, to the south. After that you get teleported down to level 8.

Level 8, the bottom of the pirate caves, has a large treasure chamber in the center of the room, with both magic pools and treasure chests. The pots in particular have enormous amounts of gold--the coffins rarely have anything other than traps. However, any party exploring this level needs to exercise extreme caution as the treasure chamber has a lot of ghosts in it. I first encountered ghosts in the Doors dungeon, but they didn't appear in anywhere near the numbers they did here.
 |
| Because of the darkness, you often can't see ghosts approach. |
There are only two monsters in the game that are as dangerous as ghosts, the Dark Demon and the Molochai, neither of which I've encountered yet. All three of these monsters have multiple attacks per round and drain levels when they hit--which they do with regularity. There are other monsters that can drain levels, but all of them either only get one attack per round or have so many other attacks that they won't commonly use their drain attacks. A battle with ghosts that goes bad can wipe out hours of progress in terms of levels lost. Frankly I'd advise against trying to loot level 8 of the Pirate's den because of them--it's not worth the risk. However once you kill off the ghosts that are on this level to start with, they don't appear to (re)spawn with regularity.
You might also notice from the map that there's two staircases, a boat, a sign and a portcullis on this level. These are all completely inaccessible without the use of either UKU or teleportation magic. Actually, they aren't the only one--there are large swaths of this dungeon that you simply cannot visit normally. The entire east half of level 6 you cannot get to through conventional means. There's a second teleport chain on level 5 in the water on the east end that similarly can't be reached except with waterwalking. Not only is this dungeon hard and confusing, it's unfinished.
 |
| Another area where they forgot to change the language--"Dark Elves" presumably existed in Deathlord prior to turning its de-Norsification. |
You can use magic to get to the normally inaccessible areas, as shown in the above screenshot, but there's not really anything of note there. The portcullis is fake (it can't be knocked down) as is the down staircase behind it.
Getting out of level 8 requires use of the southern teleport. This will bring you back up to the next stop on the teleport chain on level 5, where you'll have access to a small treasure area and some magic pools (if you go the correct way). If you wait on the teleport, you'll be taken down to level 6.

As I mentioned, everything east of the western third of this level cannot be visited without teleportation or waterwalking magic. The sole point appears to be that treasure chamber in the northwest, which you're helpfully teleported right to. The rest has nothing of interest/
The next step in the teleport chain leads down to level 7:

It's possible to collect all the treasure on level 7, but it's a meandering and roundabout route that will take you through a long passage full of Sea Dragons. But the treasure here is pretty good, especially in the pots. The teleport here will take you back to the very first step in the teleport chain, back on level 5.
After a few "tours" of the teleport chain I was thoroughly fed up with this dungeon and made my way back out. My gold stores were maxed out, (though I lost well over half of that restocking and leveling up) and I had gotten a lot of experience but I couldn't help but feel that my trip was a waste of time. It really is a bad, bad dungeon.
I've got everything that I need to take on the Deathlord himself (save perhaps a few levels) but I won't be exploring the final dungeon yet. Next post I'll visit the one other continent I have yet to see, Giluin.


No comments:
Post a Comment