Monday, July 31, 2017

Ishin no Arashi: Converting Shikoku

The han of Tokushima is on the east coast of Shikoku. After learning it had been converted to sabaku, I headed in that direction to see what I could find. Tokushima is just east of Tosa, but there are mountains between the two so you have to head to the north coast and then head east to get there.

Mountains are bad news in Ishin no Arashi. High mountains are outright impassible. Normal mountains take more life to walk through than other hexes, and you run the risk of getting involved in landslides, which can kill your bodyguards or injuring your character, reducing his maximum life.

On the way to Tokushima I had to pass through the han of Takamatsu, in Sanuki province.

Unlike the bustling Tosa, Takamatsu consists of a castle and not much else.
As you can see from the above screenshot, there's not much going on in Takamatsu. There's a harbor leading to Yokohama in Sanuki-1 (the above screenshot is Sanuki-2), and a gambling house in Sanuki-3. Takamatsu is also a very weak han. The wealth and strength of Takamatsu's army were not impressive to say the least. It only had two officials of any capacity, the jushin Hasegawa Soemon (長谷川宗右衛門) and the hanshu himself, Matsudaira Yoritane (松平頼胤).

There are four ranks of samurai affiliated with a han. Starting with the lowly hanshi (藩士), then the jushin (重臣) the karo, (家老) and lastly the hanshu. (藩主) Hanshi have no impact on a han's politics, but the jushin, karo, and hanshu all contribute to the han's overall philosophy, with the opinions of higher-ranking officals counting for more.

Both Soemon and Yoritane were lower level than Ryoma so I gave converting Takamatsu a shot. The first thing I did was go to the castle where both officials were hanging out. First I tried to convert Soemon to kogi.  It was extremely easy with our difference in levels. (1 vs 6)

The hanshu Yoritane, however, was not happy to stand around idly as I debated his subordinates, and attempted to persuade me of the rightness of the sabaku cause.

When you're the defender, you end up on the left side of the debate.
I was a higher level than Yoritane, so defending against him was pretty easy, despite his higher rank.

Yoritane has super low stats. Even if converted, he's still vulnerable to being converted back.
With his stats, Yoritane was going to be no challenge at all, but he also was not a fan of foreigners. His foreign policy was also pretty strongly joi where Ryoma's was the more foreigner-friendly kaikoku. That's a potential problem. Trying to discuss domestic policy with someone whose foreign policy is different from yours is dangerous--there's a chance that they'll try to kill you instead of listening to you. So before trying to convert Yoritane to kogi I had to convert him to kaikoku first.

That took a little over a day, and then it took me a little less than a day to convert him to kogi. As soon as I did Takamatsu's policy swapped from sabaku to kogi. But I didn't stop there--even though both Yoritane and I were now kogi partisans, I spent another day continuing to persuade him. That made his inclination toward kogi even stronger, which would provide a little protection should someone else try to persuade him.

I considered trying to convert Yoritane into a controllable PC by getting his Trust up to 80. Having a hanshu in your pocket is nice; you can control the armies and develop the han when you do. The high rank also helps a lot when debating. But Yoritane's stats were just so low, and Takamatsu was so weak that it just didn't seem worth it so I opted not to.

With Takamatsu now converted, I checked out my stats, and they had changed a bit too:

My philosophies changed from the start of the game--quite a bit.
When I started the game Ryoma was 36% sonno, 64% kogi but was now 15%/85%. His kaikoku/joi balance had also changed from 64/36 to 76/24. The reason for this is that when you argue for a specific philosophy and win, it doesn't just change your opponent's philosophy--it changes yours as well, though not to the same extent.

So, it's on to Tokushima in the east. On the way the previously-seen Harris Treaty historical event proceeded, as 88 nobles lined up to condemn the treaty. Also on the way I was notified that one Matsuda Hidejiro had gotten himself killed in a fight. I had to look him up--apparently he was a sonno-joi Shinto priest. In real life he lived a lot longer. Sucks for him I guess.

On the way to Tokushima I ran into a gambling house. Usually there's a ninkyo oyabun (ie Yakuza boss) that hangs out at each. There was one here, but Yakuza bosses are pretty inconsequential so they're not worth bothering with.

Gambling houses in Ishin no Arashi are the fastest way to gain money--or lose it. The game is Cho-han; a simple game where two dice are rolled and you bet up to 50 Ryo whether the result is even or odd.

Maybe it's 50-50 odds, but it often doesn't feel like it. Here I lose.
You can only gamble a few times per turn before getting kicked out. I ended up breaking even before continuing onward to Tokushima.

On the way to Tokushima I picked up a few more followers, and also got accosted by some random bushi that wanted to convince me of the righteousness of the sabaku cause. Getting debated by mooks is the worst--they're usually decent opponents, you can get your philosophy changed if you lose, and if you win you get nothing but lost life and a little experience.

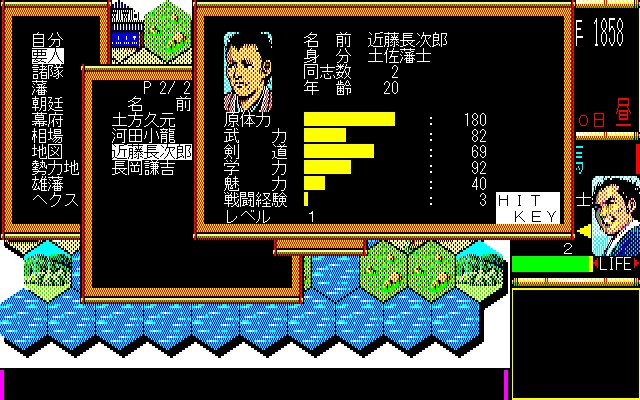
Once I got to Tokushima, I discovered that it was even less significant than Takamatsu, with only the hanshu and no karo or jushin at all. The hanshu himself, Hachisuka Narihiro (蜂須賀斉祐) was tougher than Matsudaira Yoritane at level 11, but his stats weren't that high, so I proceeded to debate him.

Narihiro's level was roughly my own, but with his lower stats, he was easy to persuade.
After about a day, I converted Narihiro--and Tokushima--to kogi, and brought Ryoma's level up to 13 in the process. I opted not to get Trust from Narihiro either, and after persuading him a few more times decided to try to convert Iyo-Matsuyama, the only non-kogi han left on Shikoku. Because why not? However the province of Iyo where it was was pretty far away; at a bare minimum it would have taken 6 days to get there normally.

Ishin no Arashi provides for the need to travel quickly with the Switch (切替) command which is available in any non-city area. It allows you to switch between "hex" mode "square" mode.

You're asked to confirm before switching modes as it takes a full day to do so.
Square Mode is designed for fast travel over land. You're presented with a more zoomed-out map of Japan, and can move up to four areas per day, as opposed to 1 in Hex Mode.

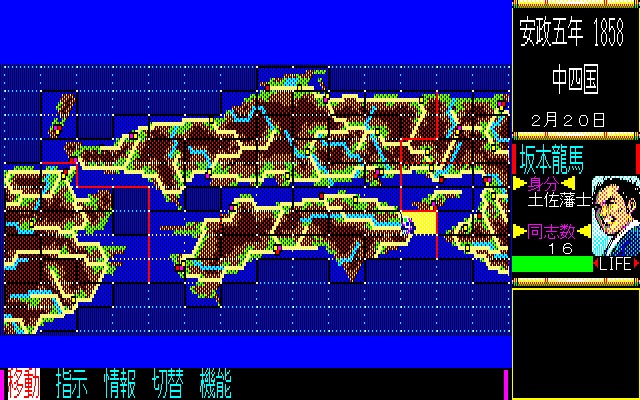
Square mode is convenient, but you can't do much more than move with it.
You don't get many commands in Square mode; you can move, change character AI, or switch back to Hex Mode, but that's it. And as each command takes a full day you're better off not fiddling with the AI. It's best to go quickly to your destination and switch back to Hex Mode.

By the 23rd of February Ryoma had made it to Iyo castle. And I got a message that the Bakufu's request for an edict condoning the Harris Treaty had been roundly rejected.

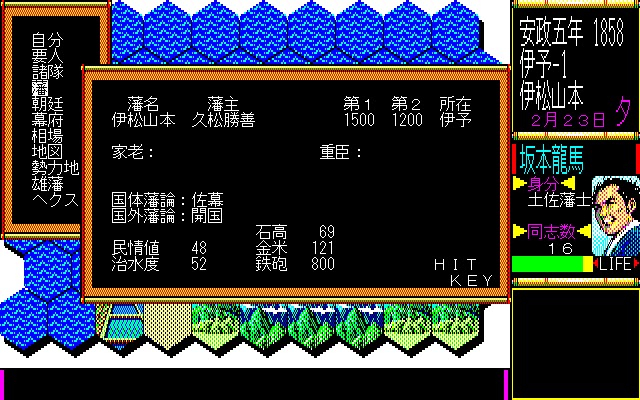
While not the strength of Tosa, Iyo-Matsuyama isn't awful--2700 soldiers and 800 guns.
Iyo-Matsuyama was like Tokushima in that there's just one guy to deal with, the hanshu Hisamatsu Katsuyoshi. He was level 11 too, so it only took me a few days to win him over. I persuaded a random court noble that wandered by too, just for good measure.

The island of Shikoku was now entirely kogi
Converting all of Shikoku was all well and good, but none of the hans on the island except for Tosa are really all that important. Ryoma was in no position to start converting yuhans, so the next step was to travel to the mainland and look for new allies and train up my stats. I headed to the first port and sailed to Yokohama.

Yokohama is located in the province of Musashi. Musashi is also where Edo, the seat of the bakufu is, so there's no hanshu, only the Shogun himself. As such Musashi can never be converted from sabaku without actually conquering the province. Edo Castle is the most heavily armed and fortified castle in the game so this is no mean feat. As an aside, conquering Edo Castle is a "hidden" way to win the game for sonno or kogi players--it's extremely difficult to do, but once Edo Castle falls you've effectively conquered the bakufu.

However I discovered a very odd bug when disembarking: the town of Yokohama was just gone.

That grass hex to the left of me is supposed to be Yokohama
I've never seen this before. I rebooted and loaded the game--Yokohama was still gone. So I started a new game and went back to this screen, and Yokohama was there like it was supposed to be. I'm not about to start over, so I guess Yokohama is going to be off limits this game. Not that it matters that much, as there's not too much in Yokohama anyway.

So rather than go to Yokohama, I decided to go to Edo instead, since it's on the same screen anyway. Edo is a massive 16-screen city, tied with Kyoto for the largest in the game. You can spend a lot of time just wandering around the city, and that's what I had Ryoma do, going from school to school boosting his Academic skill.

Despite six pages of characters being in the city, there was nobody worth recruiting. I did notice that Kenkichi and Chojiro, who I had turned on AI for, were both here training. Chojiro was still weak but Kenkichi was doing well outside of his anemic Appeal so I started traveling the city with him and persuading random people to get his level up.

Kenkichi came across one random house full of low-level Satsuma hanshi--and one random shishi from Shimosa, Sagara Sozo. (who I hadn't heard of and only gets a couple of lines in my academic Bakumatsu who's-who, yet gets tons of Google hits because apparently they've made multiple manga series about him--weird choice, Japan, any of the other dudes in this house probably would have had more interesting stories) But it was a perfect spot to start persuading and building Kenkichi's level.

Even against Kenkichi, Sagara Sozo was a pushover and swapped philosophies with one debate
Most of the Satsuma hanshi were kogi already (a little odd since Satsuma is pretty sonno-heavy except for its hanshu in scenario 1) so there wasn't even a risk of losing.

Meanwhile, I had Ryoma wander the streets of Edo traveling from school to school, slowly raising his somewhat-modest Academic attribute. While wandering the eastern end of the city, though, I got summarily attacked by a small band of shishi.

There are two types of combat in Ishin no Arashi--duel combat and army combat, although the mechanics are mostly the same. The first thing you're asked when you get attacked is whether or not you want to run, though you won't always have the option. You won't always succeed, and you'll often lose some Appeal from running from fights.

Once you're committed to the fight, you're asked whether you want to fight yourself. If you say no, then your bodyguards will fight for you. Opting to fight yourself is more dangerous but is one of the few ways you can raise your Appeal. Letting your bodyguards fight for you is safer, but you have to let the computer control the fight, and your bodyguards are usually far more fragile than you are. If you're letting your bodyguards fight for you too much they may occasionally force you to risk your neck yourself--and likewise if you take on fights yourself too much they may occasionally demand to fight in your stead.

After those two questions, the fight starts proper. Here's what the battle screen looks like.

Duels are like a very primitive fighting game
Here's what each of the options mean:


  1. Combat timer. When this reaches 60 the fight is over.
  2. Attack power. Varies based on Swordsmanship and Military stats; affects how much damage you do per attack
  3. Number of companions/bodyguards. Shows how many people are fighting.
  4. Life - the character/companion dies when this reaches 0. It's scaled to your current life, not your maximum life--so fighting after a day of debate has exhausted you is extremely dangerous.
  5. Name of the character and whether they're fighting themselves (本人) or if their bodyguards are (同士).
  6. Portrait of the fighting characters--defender on the left, attacker on the right.
  7. Number of units in reserve. When one of the fighters has their life reach 0, one of their unit markers turns into a gravestone and the next fighter comes out. When all markers are gravestones the fight is over.
  8. The characters themselves fighting
Combat itself is mostly action-based using the numeric keypad. 4 and 6 move left and right, 8, 5, and 2 are for high, stab, and low attacks respectively, and 7/9/1/3 are for blocks and stances that as far as I can tell don't actually do anything. Return will let you flee the battle. It's fast-paced and you probably won't come out unscathed. The extent of the damage won't be obvious until the fight's over.

The way damage is calculated in a fight is kind of weird. It's especially obvious when armies fight, but damage is proportional so the more people there are in a group, the more damage you'll take from each hit. For example, to take an extreme, say you have one guy fighting against an army of 5000, and they each trade one hit, bringing the other's life bar down a little bit. At the end of the fight that 1 guy will be hurt a bit--and a few hundred soldiers from the army of 5000 will be dead.

Anyhow, I took a few hits because fighting in this game is clunky, but killed the attackers with little difficulty. I got 12 points shaved off my maximum Life, but fortunately there was a restaurant nearby. Restaurants are not as good as doctors for restoring maximum life, so I had to eat there twice (paying some money both times) to restore my Life to maximum.

The foods you eat differ in appearance, but not in 
As I was leaving, I ran into Toda Ujitada (戸田氏正), the hanshu of Ogaki, pictured above at the edge of the screen. He was also really low-level. I converted him--and Ogaki--to kogi, but afterwards was flooded with messages that everyone around him was trying to convert him back, so it was unlikely that I'd be able to keep him kogi.

At this point I decided that Ryoma was wasting his time in Edo since there wasn't anyone of interest to recruit and decided to leave. I left Kenkichi there to keep training. Next post I'll be working on finding some new recruits with Ryoma and building Kenkichi into something that's not worthless in an argument.

Wednesday, July 26, 2017

Ishin No Arashi: Scenario 1 - Dawn of a New Age

Before you start a new game of Ishin no Arashi you're given one of three scenarios to choose from:


They are:
  1. Dawn of a New Age: January 28, 1858
  2. Choshu Attempts to Expel the Foreigners: May 10, 1863
  3. War for the Meiji Restoration Erupts: November 15, 1867
There isn't an enormous difference in which scenario you pick. The primary differences are:
  • Which characters you can choose as your hero differ
  • The political situation in each han is different
  • The NPCs that appear (of which there are hundreds) are different and their ranks, stats, etc differ slightly.
  • Your time limit (you have until 1876 to unite the country before the western powers invade and turn Japan into a colony)
Next you have to pick a faction and a character as your "hero." Here I'm picking Sakamoto Ryoma from the kogi faction.

Sakamoto Ryoma (坂本龍馬) is an enormously famous and popular figure from Japanese history. He was born a low-ranking member of the warrior class in the Kochi han on the island of Shikoku. He initially fell in with a hardline Sonno-joi ("Revere the emperor, expel the barbarians") activist group in Kochi, but eventually came to favor modernization and opening the country, under the tutelage of Katsu Kaishu (勝海舟). He went on to broker an alliance between the Satsuma and Choshu hans, formerly mortal enemies, opened a trading and ocean transport company called the kaientai, and eventually wrote proposals that were instrumental in negotiating the Shogun's abdication and the foundation of the Meiji government. The bakufu loyalists were not fond of him, though, and had him assassinated when he was 31.


After picking your character, you get 50 bonus points to distribute among four of his base attributes, 
Health (体力) Appeal (魅力) Academic (学力) and Military (武力). Stats range from 1-200 in most cases; Ryoma is an extremely good character with very high stats. I distributed his stats as follows:

Health: 200
Appeal: 200
Academic: 146
Military: 182

Health is arguably your most important statistic, and it can never raise from its initial level, so boosting it up to the maximum of 200 is a priority. Appeal can raise or lower during the course of a normal game, but it's hard to raise so it also gets priority for points. After that, Military is slightly harder to raise than Academic, so I distributed the remainder to that.

After that, you pick your difficulty level from 1-4 (I picked 3) and you're sent to the beginning of the game, in the town of Kochi.


Here's the main playing screen. it requires a little explanation. It's divided into 5 windows:
  1.  The main play window, a 10 x 7 hex grid.
  2.  Information about date, time, and location. From top to bottom:
    1. Year: Ansei Year 5/1858
    2. Location: In this case, Kochi-2, or the second screen in the town of Kochi.
    3. Han: In this case the Main (本) Tosa han. You can also have a sub-(支) han; this usually happens when a han gets militarily conquered by another.
    4. Date and time: in this case 1/28. Time is "Morning"(朝), which is more an indication of "turn." Each day gets four turns, Morning, Day, Evening, and Night, and all characters get one action for each.
  3. Information about your currently controlled character. From top to bottom:
    1. Name of the character
    2. Rank, in this case "Tosa hanshi" (土佐藩士, low-ranking Tosa samurai)
    3. Number of companions (ie bodyguards)
    4. Current Life bar--this refills daily
  4. Graphics or information about events appear here.
  5. Command bar. The contents of this bar vary based on who is currently being controlled and where they currently are standing. Informational text messages appear here too. The commands currently listed in this screenshot are, from left to right:
    1. Move up to 5 spaces
    2. Attack someone/something on the same/an adjacent hex
    3. Command any currently controlled armies or other characters
    4. Move up to 5 spaces and attempt to Persuade someone on the hex you end on
    5. Get Information about any number of things
    6. Change the Settings or save your game.
Before I go any further, I should probably explain the concept of a han, because it's pretty important. A han was a political entity in Edo Japan, the feudal domain of a lord subservient to the bakufu headquartered in the city of Edo, present-day Tokyo. The hans were semi-autonomous domains, with far more decentralized control than present-day Japan. Individuals were citizens of their han first and foremost, and leaving the borders of one's han without explicit permission was a crime. In Ishin no Arashi, the map is carved up into individual hans, each of which has its own officials and philosophical orientation. The borders of each han aren't their historical borders, as there were hundreds of them at the end of the Edo period. Rather the map is divided up by traditional Japanese province, with one han per province.

Speaking of which, here's the map of hans and their associated philosophies at the start of the game:


Yellow indicates sonno, blue indicates kogi, and green indicates sabaku. However, you don't need to turn the entire map your color in order to win the game. Some hans are more important than others, which can be seen in the following map:


These 13 colored hans are the yuhans, the important hans that you need to convert or conquer in order to win the game. All of these need to be converted to your philosophy to win. On this map, sonno looks like it's at a disadvantage with only 3 hans, but they tend to convert others quickly, especially on the southwest island of Kyushu.

Of particular interest is Choshu, the yellow han at the west tip of Honshu, and Aizu, the little roundish green han in the middle of the continent to the east. These are the "home bases" of sonno and sabaku philosophy respectively. Either can be converted to kogi, but Choshu can never be persuaded to convert to sabaku, and likewise Aizu can never be persuaded to convert to sonno, Those two hans must be conquered by military force to switch to their opposite philosophy. So only the kogi faction has the option of relying exclusively on persuasion rather than conquest to win the game.

Speaking of the Information menu, it's one of the most frequently visited in the game. While I won't get into every option now, a brief list of the options, so you can get a scope of what you can see, is, from top to bottom:
  • Self (自分): Your currently controlled character's information. Has sub-menus letting you see your philosophy, items, trust, etc.
  • NPC (要人): Like Self, only it shows information on characters nearby that you're not currently controlling. (including other party members)
  • Armies (諸隊): Information about armies in the area--their name, soldier count, and training levels.
  • Han (藩): Information about the han you're in--its political/military stats and a list of its rulers and ministers.
  • Court (朝廷): Information about the movers and shakers in the Emperor's court. Of little interest.
  • Bakufu (幕府): Slightly more interesting than Court information, this has wealth and troop counts in addition to names of high-ranking officials.
  • Prices (相場): The cost of guns, soldiers, and trade goods.
  • Map (地図): A grid-map of the country. Your current area flashes on it.
  • Faction Map (勢力地図): The overview map shown above with all hans and their philosophies highlighted.
  • Yuhan (雄藩): The overview map shown above with just the yuhans highlighted.
  • Hex (ヘクス): Lets you pick a hex, then displays a list of who (if anyone) is currently on it.
The very last bit of interface I'll cover before getting into the game proper is information about Ryoma's stats, since they're critical to understanding what I'm going to be doing. There are four options here: Stats (能力) Inventory (持物) Trust (信頼) and Philosophy. (思想)


Ryoma's base information as shown here in the Stats tab:

  • Name (名前): Self-explanatory
  • Rank (身分): As previously explained, your rank. This affects your chance to impress people during persuasion.
  • Companions (同士数): Number of (essentially) bodyguards traveling with you. It also effects your ability to threaten characters during persuasion.
  • Max Life (原体力): Max life. Everything depletes life in this game, but it's refilled every day. Getting physically hurt will reduce Max Life until healed. If this reaches 0, you die.
  • Military (武力): Affects both fighting and threatening people.
  • Swordsmanship (剣道): Maxes out at 100, affects damage in duels
  • Academic (学力): Affects your ability to out-reason your opponents in debate
  • Appeal (魅力): Affects your ability to charm opponents in debate. One of the few stats that can permanently decrease, and is hard to increase.
  • Combat Experience (戦闘経験): If this stat has any effects, they're slight. It caps out at 100.
  • Level (レベル): Your experience level. Is incredibly important when debating people.
I'm going to skip over the Inventory tab since it just shows how much money and trade goods you're carrying (101 Ryo and none respectively in this case)

The Trust tab is a little more important. It's not worth screenshotting, but each character has a list of characters they trust (与えている信頼) and a list of characters that trust them (持っている信頼). Without going into too much detail, Ryoma starts the game with 45 Trust points from Kawada Shoryo (河田小龍) and 25 Trust points from Nagaoka Kenkichi (長岡謙吉). Trust is complicated, but I'll explain in detail shortly.

Lastly, the Philosophy tab shows what Ryoma's current Philosophy is.


This chart is divided into Domestic Policy (国体思想) and Foreign Policy (国外思想). 

For Domestic Policy, Ryoma is currently 36% sonno and 64% kogi. Should, via losing debates, any philosophy other than kogi take the lead, Ryoma will convert to that philosophy and, if he's the only character I'm still controlling, it'll be Game Over since I'm playing the kogi faction.

For Foreign Policy, Ryoma is currently 65% kaikoku and 36% joi.  Kaikoku policy supports opening the country and maintaining relations with foreign countries. Joi policy supports expelling all foreigners. Foreign Policy is a lot less important than Domestic Policy--your main character can change with few repercussions.

So, it's time to start the game proper. The first thing to do when you enter a new area is use the Information menu to search nearby hexes and see who's there. Right to the southeast of my starting position in the above shots is Iwasaki Yataro (岩崎弥太郎). Every NPC's sprite is identified by the first character of their name. It's one of the ways you can tell an "important person" as the game calls it from generic townspeople, warriors, etc. Everybody else on this screen, except for Yoshida Toyo who was occupying the same hex as me, was inside a building; characters inside buildings do not display on the overhead map. You have to use the Hex info command to find them. Searching through each building, I found a few people of interest.


The person I was most interested in is inside the school highlighted in the screenshot above. Schools are easily identifiable by the "学" character on them. The person I wanted in the school there is Nagaoka Kenkichi, who as I mentioned earlier had given 25 of his Trust points to Ryoma.

Kenkichi's stats are not good, but he has other uses.
Nagaoka Kenkichi was, historically, a friend of Sakamoto Ryoma's and joined his Kaientai trading company. He will be my first persuasion target.

There are three types of debates you can have in Ishin no Arashi. The first and most important is Philosophy. But Kenkichi is part of the same factions as Ryoma so there isn't much use to doing that. The second is Trust; you try to debate and gain another character's Trust points. This is what I planned to do--my goal was to get Kenkichi's trust to 80. The last type of debate, Companion, only works on generic characters like townspeople and tries to convince them to become your bodyguard.

Every character has 100 Trust points they can give to other characters. If a character has 80 Trust for somebody else, then they "admire" them. Any NPC that "admires" your main character turns into a controllable PC, and should your main character die or get their Philosophy converted, you can pick among your other controllable PCs to be your new main character.

Now, Kenkichi is kind of a crappy character to join your party. He's just an ordinary Tosa Hanshi like Ryoma so his rank isn't high, and his Academic and Appeal stats are really low so he's not going to be much good at debating. But there were two advantages to debating him. The first was that his level was low so he was less likely to out-debate me. More importantly, he's one of 5 special characters--the other 4 are Kondo Chojiro (近藤長次郎), Mutsu Munemitsu (陸奥宗光), Shingu Umanosuke (新宮馬之助), and Ike Kurata (池内蔵太). If you're playing as Sakamoto Ryoma and get all 5 of these characters to join you, you can form the Kaientai, which has some nice perks.

So, on my morning turn, I moved to the school. On my second turn, it was now daytime, and I was given a new command, "School" on my command list. Selecting this command allows you to either Meet other characters at the school or Learn. I'll discuss Learning later; here I wanted to select Meet, so I could persuade Kenkichi.

You'll be seeing this screen a lot when playing this game.
The above screenshot is the debate screen. This screen is to Ishin no Arashi as a combat screen is to a JRPG. It's complicated, so I've broken the parts of the screen down here.
  1. "Attacker's" portrait and their age, rank, Philosophy, and Trust for the character they're debating.
  2. "Defender's" portrait and stats.
  3. Debate Outcome gauge. The arrow on the top slides towards whoever is losing the current debate. The winner of the debate is determined by where this arrow is when time runs out, or if it gets pushed all the way to one side.
  4. Debate timer. This counts up to 60, after which the debate ends.
  5. Topic of debate. In this case, "Trust."
  6. Remaining changes in debate tactics. Every time you change debate tactics, this number drops by 1. Once it hits 0 you have to stay with your current tactic. As a handicap, the lower level character in the debate gets more of these.
  7. Current debate tactic. These are, from top to bottom: 1. Bribe  2. Threaten  3. Logic  4. Intimidate  5. Entreat (these are very rough translations)
  8. Life. Drains slowly throughout the debate. When it hits 0 you debate far more slowly. If both characters hit 0 the debate ends with no winner.
  9. Enthusiasm. Every press of the Enter button raises this gauge a tiny bit. Once it fills up you can debate your opponent unopposed for a few seconds.
  10. Speech bubbles. Both characters spew a steady stream of speech bubbles at the opposing character. When a speech bubble "strikes" the opponent it pushes the Debate Outcome gauge toward them. The size of the bubble indicates damage; the color indicates how well it can "intercept" opposing bubbles.
My enthusiasm is at maximum, so Kenkichi just sits there and takes it for a while
Despite all this detail, the debate itself is rather simple--pick a better debate tactic than your opponent and rapidly press the Enter key to build your enthusiasm gauge up.

There's a rock-paper-scissors like mechanic for debate tactics. You can tell how good a particular tactic is against your opponent's by the color of your speech bubbles. Red is best, purple is good, green is equal, blue is bad, and yellow is worst. The scale goes:

Bribe > Intimidate > Threaten > Logic > Entreat > Bribe

Tactics are more or less effective depending on their "distance" from their target. (e.g. Intimidate is good against Logic, but not as much as Threaten)

However, that's not all--the strength of each of your debate tactics depends on your stats.

Bribe gets stronger the more money you have. (Bribery also can cost you money)
Threaten gets stronger the higher your Military stat is and the more Bodyguards you have.
Logic gets stronger the higher your Academic stat is
Intimidate gets stronger the higher your characters' Rank is
Entreat gets stronger the higher your Appeal stat is.

The better your corresponding stat is, the larger your speech bubbles will be. The larger the bubble, the more "damage" you do against your opponent when it strikes. When one of your speech bubbles strikes your opponent's, what happens to it depends on both its size and color. It might get totally cancelled out, or it might get weakened but keep going.

That's the core mechanics for debate, but there are other factors. For example, in my above debate with Kenkichi, right when I was about to win, he just got up and left. That sometimes happens when you're a low level, and it seems random. There's nothing you can do about it but try again.

I did try again--twice in fact. Once in the evening, and once at night. I succeeded in persuading him at evening and got his Trust up to 33. At night both of us ran out of Life from debate so it became a draw.

Day 2--pretty much everyone's cleared out.
Day 2 Ryoma's life was back to full--it gets refilled every morning. A bunch of people were wandering the town the day before but they all left--however there were still a few people inside their houses. NPCs that go inside buildings tend to stay there a while--it's why I could just enter the school over and over to debate Kenkichi instead of chase him around.

By mid-day, I had persuaded Kenkichi twice more and got his admiration, so now I could control him as a PC. However Kenkichi's a kind of worthless character, so I just sent him back into the school to learn some more.

Before you enter a school, it tells you what kind of school it is. This is school of Western learning.
Schools are one of the primary ways you can increase some of your stats in Ishin no Arashi. They're free, and they mostly exist to boost your Academic stat, though learning at a military academy of some sort will boost your Military stat instead. However different types of schools can also increase a character's Philosophy scores. For example Confucian schools boost sabaku and joi levels, whereas a school of Western learning like above will increase kaikoku levels. Stat and philosophy score changes at schools are very modest, but you have to be careful not to have your Domestic philosophy changed accidentally. Also after studying at a school you'll get booted out to an adjacent hex so you can study at most twice per day. Sometimes the instructor will say "that's enough for today" too, and if you go back in the same day after hearing that you'll be kicked out without any further instruction.

Since Nagaoka Kenkichi was kind of dead weight, I had Ryoma give him orders and turn on his AI.

Giving orders--I'm sending Kenkichi to school.
You can order a PC to attack, improve their swordsmanship or go to school, persuade a nearby NPC, move to a specific location, or stay put. I didn't want Kenkichi attacking or persuading anyone as he's liable to get killed or converted, so I decided to send him to school over and over until he's slightly less useless.

After sending Kenkichi on his way, I looked around and it just so happened that Kondo Chojiro, another potential Kaientai member, was hanging out at the west end of town.

Kondo Chojiro was another friend of Ryoma's that joined the Kaientai, but tried to study abroad in England, which was illegal and also against the charter of the Kaientai at the time, so his colleagues in the company forced him to commit seppuku, ritual disembowelment.

Ugh, bad stats!
It's too bad that Kenkichi and Chojiro's stats are so bad, because with their Life levels they'd make great characters otherwise. But I needed Chojiro to form the Kaientai so it was time to gain his Trust as well. I went over to the house he was staying at and persuaded him for Trust. Ryoma had gone up to level 4 persuading Kenkichi, so with the level and stat advantage winning the debates was easy. However it still takes quite a few debates to get Trust up to that magic 80 so by the end of the day I still hadn't converted Chojiro.


It was now the end of the month so before I could start the next day, I got a review of political goings-on elsewhere in the country. At the beginning of each month the rulers of each han get to make policy decisions and they play out here. There was nothing of interest this month, though. Since Ryoma is a hanshi he also got paid his monthly stipend of 25 ryo--I now had 126.

By lunchtime of the 1st I got Chojiro up to 80 Trust so he joined my party too. Chojiro's even more worthless than Kenkichi so I put him on autopilot sent him to school to get his stats up.

After sending Chojiro on his way I scanned the area and realized there was nobody worth persuading around, so headed north to Kochi's other area. It took me two days to get there, as leaving the borders of a screen and going to another takes a whole day.

The north end of Kochi has a few things of interest. There's a Shinto shrine (hex with the red torii arch) and a Buddhist temple (hex northeast of the shrine with a bell) a restaurant, (store with めし, "food" on it), a swordsmanship dojo (house with 剣, "sword" on it), a hanko (school that improves academic and kogi levels) right next it to the west, and then Tosa castle at the northwest end of town.

At the dojo--you can either meet folks or train here.
Looking around, I found one character that would be great to convince to join me--but completely futile to try--Yamanouchi Yodo, the hanshu (lord) of Tosa:

With high stats across the board, Yamanouchi Yodo would be an amazing party member.
As lord of a yuhan, Yodo's level is high--31! In a lot of ways he's the equivalent of an Ishin no Arashi "boss." Eventually you'll need to convince the lords of the yuhans to adopt your philosophy, but you'll need levels at least close to theirs to even attempt it. Too low and they won't even give you the time of day--not that you'd be able to beat them even if they did.

Nobody else here was worth debating so I spent a turn at the school learning and then left Kochi.

There are far fewer people of interest in the countryside like this than in cities.
There are two points of interest outside the city--first is the city itself; there are towns dotted around the map, but it's only these blue-roofed city tiles that will take you to a larger detailed city map. The other is the harbor. Harbors are one of two fast-travel methods in Ishin no Arashi. This one is a ferry between Kochi and Nagasaki. You don't get a choice (usually) as to where ferries take you--they have set destinations. You can't cross water yourself so they're the only way to get where you want to go in many cases.

Note from the screenshot the characters labeled 武 and 志--these are generic characters--bushi and shishi respectively. Bushi are generic samurai, Shishi are generic pro-sonno warriors. I don't think there's any substantial difference between the two, though their AI might differ a little depending on your philosophy. They can sometimes attack you out of the blue, but their primary purpose is to act as targets for Companion debates. I decided to do just that, and went to persuade the bushi on the far east end of the screen, since there were more of them.

Note the complete lack of information about the target, other than the number of people in the group
Companion debates are always hard, as they're always scaled to be about the same level as you. If you win the debate, a number of your opponents will join your retinue based on how far you pushed the debate bar. This case I managed to fully push the bar all the way to the left so all 5 joined me, but it took nearly the entirety of my life to do so. The bushi group also had 23 ryo on them, and that got added to my funds.

After converting the bushi and leaving the screen, the game informed me that the Bakufu had formally presented the Harris Treaty to the Emperor and asked him to endorse it. (This actually happened on 2/5/1858--and Hotta Masayoshi, the one who made the presentation, got rebuffed pretty hard by the anti-foreigner Emperor Komei)

On the way to the north coast of Shikoku, I also learned that the han of Tokushima, had been converted from sonno to sabaku. It's not a yuhan though so in the long run it doesn't matter--though I thought it would be a good next stop. It's close, and as it's a han of lesser importance, the nobles might be a low enough level to convert for experience. Next post I'll head over there and investigate!

Tuesday, July 25, 2017

Ishin no Arashi: A war of words


Though it's slowly improving, the state of computer gaming in Japan right now is a sad one. Go into any PC gaming area in a Japanese software shop and there will be a small, lonesome shelf with computer games, mostly imported from the West, nestled among a sea of pornographic "games." It wasn't always this way, though. During the 80s and 90s, the NEC PC-88 and PC-98 platforms were a mainstay for many great Japanese computer games, but when those platforms died, they took most of the computer gaming market with it, leaving only the cesspit that is there today.

One of the most prolific game publishers on the PC-88 and PC-98 was Koei. In the 80s they were primarily famous for their historical simulation games, especially their flagship titles Nobunaga's Ambition and Romance of the Three Kingdoms. In 1988, they released a new type of game, the "Rekoeition" game. "Rekoeition" games were hybrid-genre games, mixing RPG, strategy, and simulation, and even occasionally action mechanics together. Very few of these games were ever released to the West--the exceptions being Daikoukai Jidai (The Great Age of Sail) which were released on consoles as Uncharted Waters, and Inindo: Datou Nobunaga (Inindo: Kill Nobunaga) whose awful SNES port was released as Inindo. Other series never released included the great Taikou Risshiden (Rise of the Taikou) samurai life-simulation games, the Eiketsuden series of strategy RPGs, and the game which I'm going to cover now, Ishin no Arashi (Storm of the Restoration).

Ishin no Arashi is the first ever Rekoetion game to be released. Its initial release was on the 16-bit PC-98 platform, but in 1989, it got a  substantially changed and somewhat stripped-down re-release/port on the then more common 8-bit PC-88. It was that simpler version that went on to become the "standard." All subsequent ports of the game on other platforms like the Famicom were based on the PC-88 version. In the mid-90s a "sequel" of sorts, Ishin no Arashi: Bakumatsu Shishiden was released for Windows and Playstation. This installment was much heavier on story and RPG/visual novel game elements than its predecessor. A third installment for the Nintendo DS, Ishin no Arashi: Shippu Ryomaden was released in 2010, and though I've never played it, it looks similar to Shishiden.

I'll be playing the original, PC-98 version of Ishin no Arashi for this blog. I first purchased this game in the mid '00s, when Koei re-released many of their PC-98 classics in bundled emulators for Windows in their Teiban series. I later obtained a copy of the original PC-88 version. Here's a photo of both.

The emulated PC-98 re-release is the CD jewel case at the bottom-right, obviously.

As you can see from the above shots, Koei used to include a lot of extras in their releases. Being a historical simulation game, Ishin no Arashi includes not only a manual but a fairly hefty guide to the historical back story of the game. Also you can just barely make it out on the box, but at 9800 yen, this game was expensive--about $70 US in 1989, or roughly $140 in 2017 dollars. Even in Japan, Koei's games were pricey compared to others.

This history of Ishin no Arashi takes place during the bakumatsu period, the era of turbulence in the 1850s and 1860s that ended the 700 years of bakufu, or military government/shogunate, rule, and ushered in the ostensible "restoration" of imperial rule. The bakumatsu period likely ranks second only to the turbulent "Sengoku" period of the 15th-16th centuries when it comes to capturing the Japanese imagination--the overwhelming majority of historical fiction and Japanese-history derived works of popular culture in Japan seems to focus on one of these two eras. (The period in between gets a lot of attention, too)

The bakumatsu was arguably kicked off in 1854, when US Commodore Matthew Perry sailed into Tokyo harbor and opened up trade with Japan at the barrel of a cannon. The previous 250 years of Tokugawa rule had Japan closed off to the outside world, but Perry, followed by several other European colonial powers, forced the bakufu to open up the country's trade in a series of very unfair (for Japan) trade treaties.

This triggered a lot of unrest in Japan--during the peaceful Edo period of Tokugawa rule, the once-powerful warrior class had atrophied into a class of bureaucrats living off hereditary government stipends, and Perry exposed their weakness for all to see. Furthermore, the emperor at the time, Komei, absolutely hated foreigners, and was virulently opposed to the bakufu's opening of the country, going so far as to issue an edict to "expel the foreign barbarians" in 1863, with disastrous results for those that tried to enact it. The country divided into multiple factions--the sonno ("revere the Emperor") faction, advocating the dismantling of the bakufu and return to imperial rule, and the sabaku ("support the bakufu") faction advocating the continuation of Tokguwa rule. The sonno faction operated primarily out of not-coincidentally-enemies-of-Tokugawa-since-the-beginning western provinces like Satsuma and Choshu, while the sabaku strongholds were in the typically Tokugawa-supporting eastern provinces. Though its initial platform (especially the "expel foreigners" bit) wasn't enacted, the winner was eventually the sonno faction, with the Tokugawa bakufu being dissolved and emperor Meiji being installed as the head of a new government--if only as a semi-puppet.

Ishin no Arashi is all about these political divisions. You control a character that advocates for either sonno, sabaku, or a third, kougi (translates roughly as "public/official") faction that advocates for a third-way blending of the two. (This was a philosophy that that imperial authority should be restored with the shogun remaining an important part of the new government, though the latter never came to pass) Your goal is to unite the country--or at least the important parts of it--under a single philosophy. You could, theoretically, do this in the traditional manner of militarily conquering areas controlled by rival factions. However, winning the game militarily is extremely difficult--the most realistic path to victory is to find powerful advocates of rival philosophies and convince them of the error of their ways through good old fashioned debate.

Sitting down and talking over tea--an Ishin no Arashi take on "combat"

The debate mechanic is the most pivotal feature of Ishin no Arashi and most "combat" consists of a one-on-one war of words, where the loser's philosophy shifts towards the winner's. You can't just convince any old person of the rightness of your cause--to actually fully convert a province to your philosophy you'll need to convert its rulers, and a province's rulers won't entertain debate from just any old peasant off the street. You'll need to start from the bottom up, and will more than likely need a whole party of advocates to succeed.

Sometimes, either accidentally or deliberately, debate fails and you'll need to come to blows with NPCs or armies. For advocates of sonno and sabaku, violent confrontation is inevitable, as the "home base" of these two philosophies can never be converted to the opposite philosophy through debate. Fighting is done through a rudimentary action-based "duel" system.

Ishin no Arashi is a heavy and complicated game for its time, but it's very open-ended. For this reason the upcoming entries are likely to be dense, wordy, and somewhat slow to release. Part of the reason it took me so much time between finishing Deathlord and publishing this update was that I needed to get reacquainted with the game after not playing it for several years, and there's a lot to catch up on.


Ishin no Arashi: Endgame

January 1st of 1859 I had just converted Satsuma and all provinces of Kyushu but one, a Bakufu province, were kogi.  I had planned to start ...