Saturday, August 19, 2017

Ishin no Arashi: Endgame

January 1st of 1859 I had just converted Satsuma and all provinces of Kyushu but one, a Bakufu province, were kogi. I had planned to start moving Ryoma, Yodo, and Naosuke back to Honshu to convert more yuhans. However my job was made substantially easier in that Mori Takachika, the lord of the powerful yuhan Choshu, was running around in Kagoshima, so I didn't have to go anywhere. It took a few days of persuasion and I had to chase him down as he ran from town, but I eventually recruited him.

Mori Takachika's stats aren't all that great, but he's worth recruiting if only for control of Choshu.
Mori Takachika doesn't have much info in his English Wikipedia entry, but was an important figure in late-Edo/Early Meiji. Since before the bakufu was even founded, Choshu had been opposed to Tokguawa rule and as its hanshu, Mori was a thorn in its side. An early supporter of Sonno-joi, Mori Takachika defied the bakufu and openly warred with the Western powers until their combined might crushed his ability to fight. The bakufu had punitive expeditions launched against him for his continued defiance (and sending troops to the capital to fight bakufu troops). Eventually Mori moved to a more kaikoku philosophy and joined forces with Western powers to defeat the bakufu. With their help he modernized his troops, which would play an important role in the overthrow of the bakufu.

Recruiting and converting Mori was a big deal--it spelled the beginning of the end of the sonno faction. Satsuma and Choshu are the two most powerful sonno hans--now the only others remaining were Mito and Geishu.

While Ryoma was chasing down Mori Takachika, I had the Satsuma army attack Nagasaki in the province of Hizen, only to discover a huge enemy force about twice the size of my 6000-man-strong force. Even playing really well in the combat mini-game and only engaging the Troop-1 army guarding Nagasaki castle, I lost several thousand troops through attrition alone.

Despite having fewer soldiers than me, the better-armed and better-trained Hizen army had significantly more attack power than I did.
I did eventually conquer Nagasaki and thus Hizen, but it cost me more than half my troops, and from my most powerful army to boot. Fortunately with the lucky recruitment of Mori Takachika, I had an army almost as good guarding Choshu castle. However the Choshu-2 mobile army was very weak--probably because I annhilated it when it attempted to attack Yodo earlier. However, it just so happened that unit was in the same screen as the final Kaientai member I needed, Ike Kurata. I had them follow him around until Ryoma could get there to recruit him.

I finally cornered Kurata in the mountains of Geishu, where Ryoma got his Trust up to almost 80--but completely ran out of energy. Kurata still had a bit left--he escaped and ran off somewhere. Chasing him down was becoming a recurring theme of this game.

With several new, capable characters under my control, I rearranged them into slightly new groups:
  • Yamanouchi Yodo and Ii Naosuke, who started working the Chugoku area of western Honshu
  • Mutsu Munemitsu and Inaba Masakuni who worked the Tohoku northeastern region
  • Mori Takachika who "patrolled" the Shin'etsu region between Kyoto and Edo to make sure it stayed kogi
  • Shimazu Tadayoshi who likewise "patrolled" Kyushu
  • Nagaoka Kenkichi, Shingu Umanosuke, and Kondo Chojiro who worked Shikoku
  • Ryoma himself who went where he was needed.

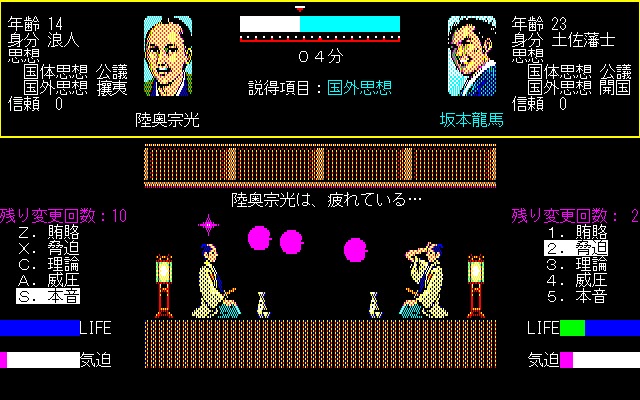
The remaining yuhans were challenging because none of their hanshu stayed put--they were wandering around the country trying to convert other hans so they were hard to find. Takachika did run into the hanshu of Nagaoka, Makino Tadayuki, in the the middle of the mountains in central Japan. Munemitsu and Masakuni joined Takachika in an attempt to convert him.

However, converting Tadayuki would prove difficult. My characters were on par with him in terms of levels, but even still, if I attempted to debate domestic policy he'd have a "blood pressure" (血圧) bar that if filled would risk him getting angry.

There's a somewhat sneaky way around this that I employed, though. Debating foreign policy will never produce a "blood pressure" bar, so I had my three characters debate Tadayuki about foreign policy until he was completely exhausted. Only then did I start debating domestic policy. Exhausted characters can't fill their Blood Pressure bar, so it was a way to avoid that risk.

You usually need multiple characters to pull this trick off.

I eventually converted Tadayuki, adding one more yuhan to those converted. Shortly after, I used the same tactic with Yamanouchi Yodo and Inaba Masakuni to convert Asano Naritaka, the hanshu of Geishu. With Geishu turning kogi, the only remaining sonno han was Mito, on the east coast of Japan.

While returning to Tosa from their various expeditions conquering bakufu-controlled provinces, the Tosa army ran across Ike Kurata once more, who was hanging out in the middle of the mountains. This time, to keep him from running while Ryoma came back to Tosa to recruit him, I stationed characters in every screen near where Kurata was so I could ensure he didn't get away. And this time it worked--towards the end of February, I finally managed to recruit Ike Kurata and form the Kaientai.

This took way longer than I wanted it to.
I didn't mention before exactly why I was so focused on forming the Kaientai in the first place, and this late in the game its benefits were not as great as they would have been earlier, but here's the main benefits of forming the Kaientai:

  • All Kaientai members have their rank changed to "Kaientai" which is the equivalent of a jushin in terms of debate. (Ironically this meant Ryoma, who was a karo, took a hit here)
  • Once the Kaientai is formed, all of its members get a huge experience boost. Low level characters can go up over 10 levels.
  • When using a seaport, instead of being taken to that port's destination, Kaientai members are given a choice of destination from any of the other seaports in the game.
That last perk is the most important one--Kaientai members get mobility around the country like no other characters in the game. Trips that would take more than a week even with existing fast travel methods can be done in a single day with Kaientai members. 

Now as Kaientai members, even formerly worthless characters like Kondo Chojiro and Shingu Umanosuke were capable of converting low-level hanshu and almost any karo or jushin in the game. And Mutsu Munemitsu was now a powerhouse capable of converting yuhans singlehandedly.

By the end of February, Japan was starting to look very blue.


All bakufu-controlled provinces outside of Yamashiro and Musashi (where Kyoto and Edo are respectively) had been conquered. All yuhans but Aizu, Sendai, and Mito had been converted to kogi. While managing my hans at the end of February, I shuffled several armies and sent the combined forces of Satsuma, Choshu, and Tosa--over 30,000 troops--to Yodo castle, right outside of Kyoto. I had never conquered the Imperial Palace through military force before and wanted to see what would happen.

There were only a half-dozen or so remaining hans to convert, but that was easier said than done. In all of them, the hanshu were out and about somewhere else in the country, and weren't at home in their castles.

Fortunately, there's a method for tracking wandering hanshu down. If you recruit either bushi or shishi bodyguards in a province, they'll tell you where the local hanshu is. For example, I had a character recruit some bushi in Tottori (the one yellow holdout in west Japan) and after winning the debate, they told me "The hanshu is in Yonezawa," Yonezawa being a province in the Tohoku northern region. So I could direct one of my closer characters (since going from Tottori to Yonezawa is going to take forever, kaientai or not) to Yonezawa in an attempt to find him.

Still, this isn't a foolproof method of finding errant hanshu as they may have moved on by the time you reach the area you were told they're at. This happened to me several times.

I did, however, discover that Matsudaira Katamori, the hanshu of Aizu, was just sitting at home in his castle, so I had Ryoma himself attempt to convert him.

Aizu is the sabaku equivalent of Choshu; it can never be converted to sonno through debate and needs to be conquered. It can, however, be converted to kogi, and that's just what I had Ryoma do. This was not at all difficult, as Ryoma was practically at the level cap of 43 and Katamori was only at level 28.

It took only a few debates to convert Katamori entirely.
 For good measure, I recruited Katamori as well--Aizu is a very powerful han and worth controlling directly.

Matsudaira Katamori was an interesting figure in the Bakumatsu period. He's famous for supporting the bakufu and fighting against the pro-imperial forces in the Boshin War, but it wasn't entirely from his own desires. In 1862, he was appointed Kyoto Shugoshoku by the bakufu, largely against his own will. The Kyoto Shugoshoku was responsible for keeping order in the city of Kyoto--a difficult task, as Kyoto was a hotbed of sonno-joi activity and political assassinations at the time. As Kyoto Shugoshoku, Matsudaira Katamori sponsored several city patrol units, such as the famous shinsengumi. When things came to a head in the battle of Toba-Fushimi in 1868, Katamori's Aizu troops fought for the Shogun in Kyoto and were crushed by the combined Satsuma-Choshu armies, and then crushed again at Aizu itself in the battle of Aizu. In the interim between those battles, Matsudaira Katamori tried to make good with the Imperial court, but the Satsuma/Choshu victors would not let him off, angry at him for his former work as Kyoto Shugoshoku. However, despite being on the losing side, Katamori did survive the period, escaping execution, and went on to be a priest post-Restoration.

Note that Katamori is level 27 here--he lost a level debating with Ryoma. If you lose a debate, you also lose experience.
Aizu's army was big--but it was in severe danger the second I recruited Katamori. It was currently on the same screen as Edo castle--the most heavily-defended sabaku province in the game. Now a kogi army, it was grossly outnumbered by the tens of thousands of bakufu troops nearby, so I had it beat a hasty retreat out of the city.

With the conversion of Aizu, there were just two yuhans left to convert--Mito and Sendai. I sent Mutsu Munemitsu and Inaba Masakuni to Mito to see if they could convert it, but the hanshu of Sendai was nowhere to be found. I sent Kondo Chojiro to Sendai to recruit local bushi and shishi to find out where he was, and it appeared that he was wandering central Japan somewhere. Every other character I combined in one massive party to follow whatever lead Chojiro came up with.

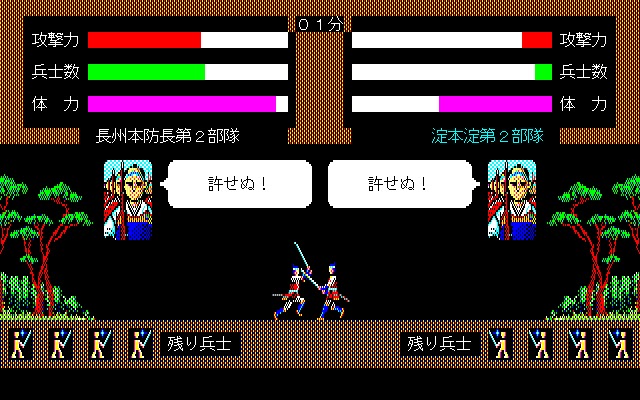
Meanwhile my massive army had reached Kyoto. Strangely enough one of Kyoto's military units was nowhere to be found, so there were a "mere" 6000 soldiers guarding the imperial palace. That would seem to be easy pickings for 30000+ troops--but it wasn't at all. Despite being less well trained and outnumbered 5 to 1, the castle's defense gave the defending troops a decisive advantage over mine.

As you can see from the attack power bars, the defending soldiers had a huge advantage.
Despite doing well in the fighting minigame, it took two days to whittle down the defenders to the point I could conquer the castle, and I lost about as many troops as I killed, if not more. And when I conquered the palace...nothing happened. Yamashiro just reverted to my control the same as any other province. I guess nothing special happens when you conquer the Imperial Palace. For the hell of it I sent all my troops to Edo, the one remaining holdout of Bakufu control. That included a new 7000-soldier-strong Yamashiro troop, which was apparently on its way to attempt to conquer Choshu when I took over Kyoto.

Right after Kyoto fell to my army, Munemitsu and Masakuni arrived at Mito, the final sonno han of the game. Looking at the makeup of the han I saw that I had my work cut out for me, with 2 karo and nearly all of them very strong sonno-joi advocates, I was going to need to do a lot of debating among multiple people--many of whom were not present.

The hanshu had 89 sonno, 81 joi--a lot of negotiation would be necessary. 
The makeup of the han was also very strange, and I'm not sure exactly what Koei was doing when they set up this scenario. The hanshu was Tokugawa Yoshiatsu, elder brother of the final Shogun and final hanshu of Mito. Fair enough, except in 1858/1859 he wasn't hanshu, his father, Tokugawa Nariaki was. Stranger still, Tokugawa Nariaki was still alive in-game as a Mito karo.

Speaking of Nariaki, my clowncar of characters chasing after Yoshiatsu ran into him outside of Kyoto. He was even more extreme than his son with 100 sonno/joi points but I left behind a few characters to convert him. I couldn't bring him all the way to kogi, but I pulled his sonno levels low enough, and Yoshiatsu's kogi levels high enough, to convert Mito to kogi. The sonno philosophy was finished, wiped off the map. Only one province remained to convert--Sendai.


The other green province is Musashi, where Edo is--the only way to turn it blue is to conquer it, which ends the game immediately regardless of the state of the rest of the country.
Of course the hanshu of Sendai was running around seemingly at random throughout the country so tracking him down was no mean feat. I had a whole train of characters chasing after him, as Kondo Chojiro recruited mooks in Sendai to find out where he was at any given moment. I finally tracked him down...in Sendai castle itself. Date Yoshikuni, hanshu of Sendai, was apparently just going home.

Of course Date Yoshikuni was no match for a half dozen high level characters and he was quickly converted to kogi..

"Sakamoto Ryoma, you have unified all yuhans to the kogi philosophy." 
Now all yuhans, and all provinces except for Musashi for that matter, were kogi. It's not an instant endgame though--you have to speak to the Emperor and the Shogun to finish the game proper. In the interim it is feasible for a yuhan to get converted back, though not at all likely.

Oh, and speaking of Musashi, things were heating up there.

Edo castle, surrounded and outnumbered.
17,000 soldiers for them versus about 35,000 for me. Their training level averaged about 118; mine averaged at about 150. It would seem like I had a big advantage--but I actually didn't. The odds were in fact pretty even, or even slightly better on their side. This is because of the absolutely absurd defense level of Edo castle, which makes the Imperial Palace look like a walk in the park. If I fought a battle that ended in a decisive victory for my side, I'd usually end up losing slightly more troops than the enemy--to say nothing of what would happen should I do poorly.

This really only held for the 10,000 troops holed up in the castle. Musashi unit 2, which was wandering around outside of the castle was not so tough. I was evenly matched or slightly at an advantage to them. Still, the combined enemy forces annihilated my unit from Nagasaki castle, brought the main Choshu army to within an inch of its life, and killed about half of all the other troops before I reduced the castle to a skeleton crew. I decided not to kill those last few troops, opting for the more traditional win by talking to the Shogun and Emperor. While technically possible to win the game by conquering Edo Castle, you really don't want to do that, as we'll soon see.

Note in the above screenshot that Ike Kurata was hanging out by Edo castle at this time. The Shogun, Tokugawa Iemochi, was in the castle at the time, but I couldn't meet with him. The final audiences to win the game have to be done by your main character, in this case Ryoma.

Painting the country one color like this is not necessary to winning the game, and frankly a bit overkill
Speaking of Ryoma, he was in Kyoto, looking for the emperor. The Emperor himself wasn't at the palace, but in a house full of courtiers nearby. When you meet with the Emperor, you get a special command "Emperor." You can't do it until the yuhans have a united philosophy. There's also no need to meet the Emperor if you're the sonno faction. In that case, you only have to meet the Shogun to win the game. Likewise there's no need to meet with the Shogun if you're the sabaku faction. Only the kogi faction has to meet with both leaders to win the game.

"Emperor Komei speaks: If indeed all the yuhans favor the kogi philosophy, it is truly a cause for celebration. However, the court would still like to hear the opinion of the Shogun's house."

So, it's off to Edo to speak to the Shogun. I put everyone else besides Ryoma on autopilot for this to make it quicker; controlling a dozen armies and other characters each day just slows things up. It took about a week and a half to get to the Shogun (even with a Kaientai member, getting from Kyoto to Edo takes a while) but he acquiesced like the Emperor.

"Shogun Tokugawa Iemochi speaks: If all the Yuhans are united in the kogi philosophy and the court is likewise in agreement, the House of Tokugawa has absolutely no objections."
 With both the Emperor and Shogun consulted, the game is over, and cuts straight to the ending.


"In May of 1859, through the efforts of Sakamoto Ryoma, Japan was united under the kogi philosophy. The Imperial Court and the bakufu joined forces to build a new Japan. And thus, the Meiji Restoration was complete."

It's an old game so the ending isn't terribly fancy. After that you get a "GAME OVER" window with the option to return to the title screen or quit the program.

Oh, and as for conquering Edo Castle? This is why you don't really want to "win" the game that way.

This is what happens immediately after one of your troops conquers Edo castle.
No splash screen, no real "ending" of any sort, just a straight-up "GAME OVER" window. It's almost questionable if you could really count this as a "win" of any sort.

The sonno and sabaku endings are almost the same as the kogi endings; the text box has different contents but that's really the extent of the differences. Also you don't need to speak to the Shogun for the sabaku ending; likewise you don't need to speak to the Emperor for the sonno ending.

So that about does it for Ishin no Arashi! Looking back, there are two things I didn't explain: there are ferries across some rivers that you sometimes have to wait a few days to cross due to flooding. And there are some mines in the far reaches of the country you can dig for gold (ie money) in. But that's it--once you understand the basic rules and framework, the rest of the game explains itself due to its very open-ended nature. 

Next post I'll delve a little more into the alternate versions of Ishin no Arashi and perhaps its "sequel", Ishin no Arashi: Bakumatsu Shishiden, before wrapping up this game entirely.

Friday, August 11, 2017

Ishin no Arashi: Slowly turning Japan blue

It was now "autumn" of 1858 in Ishin no Arashi terms (ie, July) so the music switched again. And once again, my lone han of Yodo was under constant enemy assault. 4484 enemy soldiers camped outside my castle and 166 of my own to defend with.

Look at the Training level of my solitary Yodo-1 soldier--165!
Taking a look at the local armies' stats, I saw why the fighting mini-game was seeming easier--with all the combats under his belt my lone Yodo super-soldier had an absolutely absurd Training level. Though with all these enemies it looked like it was going to go even higher.

In Edo, Ryoma made a discovery--Ii Naosuke (井伊直弼), the lord of Hikone han and a high-ranking bakufu official, was hanging out right outside the Shogun's residence.

Ii Naosuke was an enormously influential figure in late-Edo Japan. He was instrumental in getting the Harris Treaty signed, and was also the primary mover and shaker behind determining the succession of then-Shogun Tokugawa Iesada, who was in very poor health. At the time he was at loggerheads with Tokugawa Nariaki, the prominent sonno-joi lord of Mito han. Eventually the conflict came to a head and Ii Naosuke enacted the Ansei Purge, a massive purge of his political enemies in the bakufu and court. This unsurprisingly greatly angered the joi faction, and Ii was assassinated right in front of the Shogun's palace by several Mito Samurai in the famous Sakuradamon incident. Ii Naosuke was also accomplished at the tea ceremony. If you go to present-day Hikone castle, you can have some traditional tea ceremony tea there--it's the best I've ever had. Also Ii Naosuke's childhood home is close and turned into a really interesting museum, which contains a palanquin he used to be carried around in.

I alluded to this in the past post, but Ii Naosuke is important because at some point in 1858 he will enact the Ansei purge and a lot of in-game characters get killed or otherwise removed from the game. My goal was to attempt to convert and recruit him before this happened to see if the event would still occur. And Ii Naosuke is a great character too.

While I was visiting Ii's house, Tokugawa Iesada, the Shogun, died suddenly on July 4th. Odd, since in real life he died in August and this game is pretty faithful with its historical events.

Tokugawa Iesada's dead, long live Shogun Tokugawa Iemochi.
Ii Naosuke was much the same situation as Inaba Masakuni was last post--I was a slightly higher level than him but couldn't debate domestic policy without him getting huffy. However for whatever reason he was interested in debating me, which was easier. If I initiated the debate his Enthusiasm gauge would be replaced with the Blood Pressure gauge, but not if he did. It took a while since Naosuke's a good debater, but after a few days I successfully converted him to kogi. It wasn't enough to convert his han though, as none of his subordinates shared the philosophy.

Meanwhile Munemitsu and Masakuni were running around the Kyoto area converting all the hans they could. Hikone, Naosuke's han, is there too. And in a debate with the karo of Hikone, Okamoto Hansuke, Munemitsu successfully converted the han to kogi.


Hansuke wasn't kogi yet, but the aggregate with his kogi level was high enough to make Hikone's philosophy switch nonetheless.
This was a big deal--Hikone is a yuhan, one of the hans you have to convert to win the game. It's a small first step, but it's the first significant accomplishment I had made toward that goal. And unlike Yodo, Hikone is fairly strong, so should I recruit Naosuke, I'd have a decent army under my control. So recruit him was the next thing I did.

Only a sliver of Life left--Ii Naosuke is not a pushover in debate.

With Ii Naosuke on my team, I was really curious as to what would happen; normally when you pick him as your main character, you're given the option to enact the Ansei Purge. (If you do, you're essentially putting a time limit on your game until 1860, because you'll be auto-assassinated) In a sabaku game you just need to remain in control of Hikone and stay as tairo of the bakufu. But Naosuke's not the main character and he's also kogi now. I'd learn soon enough.

I decided to check the yuhan map--one more blue province in the center of the map that wasn't there before.

This isn't as big a win as could be though, as Saga, a starting kogi yuhan on Kyushu had already been converted to sonno.
The map was a little better but not great--at the very least, kogi provinces outnumbered the others. That is, until another historical event happened--the hanshu of Satsuma, Shimazu Nariakira, died of illness--Satsuma rapidly changed from kogi to sonno. Another historical event followed on its heels--the signing of several other trade treaties with European powers. Strange, since historically Ii Naosuke was responsible for those, and now he was traipsing along the countryside with me.

Speaking of which, because I had no idea where any of my would-be Kaientai teammembers were, I decided to send Naosuke and Ryoma back to Tosa, on the hunch that, being all Tosa samurai, they went back at some point.

The hunch proved to be right...sorta. Kondo Chojiro went back, but Nagaoka Kenkichi was nowhere to be found. At this point I suspected he managed to get himself killed somehow, though I was soon to find out that was wrong. Also, while there, I made a fortuitous discoverey--Shingu Umanosuke (新宮馬之助) was there. Another potential Kaientai member, I rapidly recruited him.

There's not much I can say about Shingu Umanosuke, as he was a relatively minor player in the scheme of things during the Bakumatsu. He was a friend of Sakamoto Ryoma's and joined the Kaientai, where he was a major figure. He went on to have a fairly distinguished career as a naval officer after the war.

Those are some bad stats.
Umanosuke is never, ever going to be a player with stats like that. Still, he might come in some minor use at some point in the future.

I had the idea at this point of going back and attempting to recruit Yamanouchi Yodo, the hanshu of Tosa, since Ryoma was at a pretty high level and Naosuke would be good backup. But even still, Yodo was just a little too high-level for me to recruit just yet.

I set my controllable characters into two parties, to look for more Kaientai members and convert lesser hans when possible. Ryoma and Naosuke was my A-team, and Masakuni and Munemitsu were my B-Team. I sent the A-Team to Nagasaki, while the B-team worked on hans in the Kyoto area.

Within two weeks I had converted a swath of central Japan to kogi and things were looking good. And then a really annoying historical event happened--Emperor Komei sent out an edict condemning the Harris Treaty. And a wave of sonno sentiment hit the nation.

The map went from this:


To this:


Frustratingly, it was mostly kogi provinces that got converted, including the yuhan of Owari. Having been beaten down enough, enemy armies had laid off my beleaguered han of Yodo--now I had new, formerly unfought hans to deal with.

The A-Team of Ryoma and Naosuke started staunching the bleeding immediately. Hizen (the province Nagasaki is in) was directly controlled by the Bakufu (and Ike Kurata wasn't in his brothel) so I couldn't couldn't do anything there, but I did manage to convert the adjacent han of Saga--which is also a yuhan. And it was much easier than converting Hikone since Naosuke was helping.

Also, I still had that nice blue blob in the center of the map. But there were some ugly pockets of green in them. Those pockets cannot be converted through debate because they're sub-hans of the bakufu, which will always be sabaku. Kawachi, Yamashiro, Izumi, Settsu, and Iga all fall under that umbrella. So I started to conquer them militarily, using the same tactics I used to defend Yodo castle--attack, then flee when necessary.

A lone soldier from Yodo killed the hundreds of soldiers in Kawachi castle
Even if I made a mistake and got my army wiped out (which happened a few times) it wasn't really a big deal, because when a Unit 2 from a han gets destroyed a new, very weak and untrained one with 150 soldiers or so gets automatically respawned at its home base. Since I was attacking hans close by it was pretty easy because they were garrisoned with skeleton crews, having gotten slaughtered trying to kill my "super soldier" back at Yodo castle.

Meanwhile, my B-Team of Masakuni and Munemitsu found Nagaoka Kenkichi wandering aimlessly between two screens in Ise province, near the center of the map. Someone had converted him to sonno which is why I lost him as a playable character. I've noticed that when the AI debates each other, the one with the higher Appeal, rather than level, tends to get heavily favored. That would explain why Kenkichi lost out.

So I had to move Ryoma and Naosuke all the way from Kyushu so that Ryoma could re-recruit him. The rest of the group debated him over and over again to reduce his life and convert him back to Kogi. Finally after chasing him back and forth for a week Ryoma finally re-recruited him, and I promptly turned on his AI and sent him back to Kochi to stay out of trouble.

While that was going on, the combined forces of Yodo and its new sub-hans were throwing themselves at Osaka castle.

Osaka Castle had a ton of soldiers in it--I lost several armies assaulting it.
After its conquest, the big blue blob in the center of the map was staring to look a lot nicer. Only Iga and Yamashiro remained, and they were tough nuts to crack. Yamashiro in particular houses the imperial palace, and with nearly 20,000 troops stationed there, is almost impregnable.

Japan after Yodo's mini-rampage.
Iga I didn't attack with Yodo--Naosuke's yuhan, Hikone had thousands of troops at its disposal.  I actually lost more troops than I would have expected but I did end up conquering it. I guess Iga historically was always a tough nut to crack.

While Yodo was throwing its troops around I split the A- and B-Teams apart again, sending the A to the west and the B to the east. And on September 8th I learned the mechanics of the Ansei Purge a little better, as I was asked whether or not I would enact it when Ii Naosuke's turn rolled around.

"Sir Ii Naosuke, will you arrest/execute the extremist shishi?" No, I will not.
I guess Ii Naosuke's philosophy doesn't matter in regards to the Ansei Purge; so long as he's in charge at the bakufu you can do it. I suspect you might even be able to enact it if he's been converted to sonno. Regardless, carrying out the purge is a bad idea--you kill off a couple of prominent sonno characters in exchange for Naosuke getting assassinated in 1860. And I'd like to keep him around.

While Team A was in Kyushu, I made two discoveries. First, the soldiers in Hikone spotted Ike Kurata, the last member of the Kaientai. Too bad Ryoma was halfway across the country. Second, Team A ran into Yamnouchi Yodo, the hanshu of Tosa. I still wasn't high enough level to recruit him without him running away mid-debate, so I had Ii Naosuke debate him over politics until both were exhausted. Then I had Ryoma debate him for Trust, until I finally had him recruited. Now I had two yuhans under my direct control.

His Military is a little low, but at Level 33 Yamanouchi Yodo is a powerhouse.

Yamanouchi Yodo's English Wikipedia entry is really small but he was a very important personage in late-Edo Japan. An important figure in both the Imperial Court and the Bakufu at different times in his life, he seemed to sway between sonno and sabaku to the point that the phrase "When he's drunk he's pro-Emperor, when he's sober he's pro-bakufu" was said about him. As hanshu of Tosa, he made great strides to modernize his domain. Possibly most importantly, he was also the one who advised the Shogun to adopt Sakamoto Ryoma's plan for returning power to the Emperor, which he learned of from their mutual acquaintance Goto Shojiro.

I decided to send Yamanouchi around Kyushu converting lesser hans while Team A went back to the mainland to look for Ike Kurata. Yamanouchi had a chance encounter with Kato Shisho (加藤司書), the karo of Fukuoka, who was very, very strongly joi and when I tried to persuade him to switch to kogi, attempted to kill me. However I killed him, which did exactly nothing to change Fukuoka's philosophy because his position was filled by an odd character named Kato Shi...yoshi? (加藤司吉) I don't really know because that's not a name. One odd thing about Ishin no Arashi is that if you ever kill an NPC, they immediately get replaced with an NPC that's identical in every way except for one character of their name getting changed. It makes killing NPCs utterly pointless.

Recruiting Yamanouchi Yodo had another side benefit--I could now control the ranks of anyone associated with Tosa. Fortunately for me, nearly all of my controllable PCs were from Tosa. I demoted all the current jushin and made space for Sakamoto Ryoma, Kondo Chojiro, Nagaoka Kenkichi, and Shingu Umanosuke, and promoted them from hanshi to jushin. You can only change one rank per month so I couldn't promote Ryoma straight to karo.

There are lots of hanshi in Tosa to choose from when promoting--three pages worth.
With a bevy of jushin under my control, things got a bit easier. Well, Chojiro and Umanosuke were still pretty worthless, but Kenkichi could take on low-level hans and Ryoma was becoming nigh-unstoppable in debate. So during the month of November I slowly worked my way across areas of the country in multiple groups, converting low-level hans. I avoided the yuhans, as only Ryoma had the ability to convert them, and solo that was tough.

Or so I thought. While taking a scenic walk eastward across Japan, Mutsu Munemitsu and Inaba Masakuni passed the castle of Owari, one of the yuhans.  And, for whatever reason, the lord of Owari, Tokugawa Yoshikatsu (徳川義勝), decided to charge out of the safe confines of his castle and convince Masakuni of the rightness of the sonno cause. In fact he chased Masakuni for several days and across multiple provinces. In doing so, he reduced his life so much that Masakuni was able to persuade him despite being a lower level. So Owari changed to kogi without my even trying.

Yoshikatsu gets converted in a debate he initiated. I was not expecting this to happen.
Though I had cleared out  most of the bakufu-controlled provinces in central Japan, there were still plenty more. However they were pretty well-defended so I sent Tosa's substantial army, 5000 men strong, after them. I conquered several with them--Awaji, Noto, and Hida--and though I fought really well in all three against small, untrained forces, I still lost 1000 men from the army from sheer attrition alone.

Incidentally, these kinds of losses is why it's almost impossible to win Ishin no Arashi through military conquest alone. A very prosperous province might be able to afford recruiting a few hundred soldiers per year--you can never replace soldiers faster than you lose them, and you won't be able to get enough to conquer the country without making use of crazy exploits.

Anyhow, between the efforts of Tosa's army and my A/B team, Japan was starting to look pretty good by the end of November.

There's a lot of blue on that map.
At the end of November I promoted Ryoma to karo. That gave him additional bodyguards as well--he now had over 300. This actually turned out to be a pretty substantial bug--the maximum number of bodyguards you can have is 200. The number of bodyguards also affects the Intimidate command during persuasion, but 300 guards caused an overflow and made it impossible for Ryoma to Intimidate at all. So I deliberately got him into a fight--this caused the game to "check" his number of Bodyguards and dropped it back down to the maximum of 200.

Meanwhile Tosa's army decided to head for some of the Bakufu's provinces on the Kanto plain, southeast of the big blue blob in the picture above. I gave up looking for Ike Kurata with my A team too and sent them to Kyushu, where I had Yamanouchi Yodo converting minor hans.

Before the end of the year I made one last push to convert and recruit a new yuhan. Specifically, the han of Satsuma, in the extreme southwest corner of the map. Satsuma is one of the most powerful hans in the game, and had 15,000 soldiers and a hefty income.  It was led by Shimazu Tadayoshi (島津忠義), who I had Ryoma, Yodo, and Naosuke triple-team to convert and recruit.

Despite being the nominal ruler of one of the most powerful hans in late-Edo Japan, Shimazu Tadayoshi didn't actually do much during his reign; he became hanshu at a young age and most of the actual administration came from his father Hisamitsu and his advisors Saigo Takamori and Okubo Toshimichi. One of his major contributions came post-bakufu, when he helped start the abolition of the han system by voluntarily returning control of his domain to the emperor.

Tadayoshi's stats are very low, but the power of his han makes up for it.

With the army of Satsuma under my command, more crazy things like attempting to conquer the Imperial palace or the Shogun's castle started becoming if not possible, then at least thinkable. Satsuma is also a yuhan, and its conversion brought the total number of kogi yuhans to 7--leaving only 6 more to convert. By the end of the year the country was starting to turn very blue.

White hans in this picture were those I directly controlled.
Still, some of the toughest hans remained unconverted. I had quite a few high-level characters on my team at this point, and Ryoma was approaching the level cap at 39 (42 is the max) so I could start thinking about going after the yuhans in earnest and finishing the game. At the very least, it was likely that I could win before the end of 1859.

Next post I'll start mobilizing the hanshu I control to start converting the remaining yuhans. Though not necessary to complete the game, I'll see if I can't turn the entire country blue, with the exception of the provinces that hold the Imperial Palace and Shogun's castle. 

Thursday, August 3, 2017

Ishin no Arashi: Taking over (and defending) a han

Last post I converted Shikoku to kogi and wandered the streets of Edo semi-aimlessly for a couple of weeks before deciding to leave. Upon leaving Edo, I saw a character nearby that looked like a very good target for persuasion--Inaba Masakuni, the hanshu of Yodo. His stats were good and he was two levels lower than me so he seemed worth persuading.

Inaba Masakuni was lord of the Yodo han and later an official in Meiji Japan. He's mostly famous for refusing entry of the fleeing bakufu army at the battle of Toba-Fushimi during the Boshin war, helping turn the tide toward the imperial forces. However what's interesting is that despite that, he was actually a strong proponent of the shogun and wanted to side with him, but was opposed by his own court. Though Yodo defected to the imperial side, Masakuni didn't really want to.

This didn't turn out like I'd expect..
I found that despite having overall lower level and stats than me, I was outmatched by Masakuni. When you're debating someone who's out of your league, the Enthusiasm (気迫) bar for your opponent gets replaced by a Blood Pressure (血圧) bar. When the Blood Pressure bar gets maxed out it's bad news. Your Enthusiasm bar gets frozen, and your opponent will get angry, spewing a constant stream of speech bubbles for the rest of the debate. If you lose or someone runs out of Life the debate will instantly end, and your opponent may either leave furious or outright attack you mid-debate. If the opponent leaves angry, you won't be able to talk to him for a few days, as he'll attack you if you try. I lost this match--I'd have to get a few more levels or a better rank under my belt before I tried this again.

Rather than stick around, Ryoma took a nearby boat to Osaka. Osaka was dead empty so I decided to go to Kyoto instead. Kyoto is second only to Edo in terms of its activity.

Meanwhile I decided to do something about Kenkichi's anemic Appeal stat--I sent him to the brothel.

I lucked out this time--this event gives you a few extra Appeal points.
Brothels are very expensive at 20 Ryo a visit. They refill Life, but there's also a small chance that you'll win over the most beautiful courtesan there, which will bump up your Appeal points by a bit. This is probably the most efficient way to gain Appeal, but it's costly. I'd either have to recruit a ton of bodyguards for their funds or hit the jackpot gambling or both to keep this up.

On the way to Kyoto, there was an obstacle--a checkpoint.

Checkpoints are usually also at chokepoints--in this case, blocking a river crossing.
Checkpoints are dangerous. Depending on your rank and your philosophy, you can get detained there. You can sometimes fight your way out, but either way if they end up catching you, there's a chance that you'll get tortured to death and lose the character in question. There was a long way around this checkpoint to get to Kyoto, but it would have taken me several more days. Fortunately I made it through this checkpoint unscathed.

Reaching Kyoto itself, it was now April 1st, and "summer" by Ishin no Arashi's standards. It doesn't make a huge difference, but every season the background music changes. I also made a discovery--Mutsu Munemitsu was there somewhere.

His Military is a little low, but otherwise Munemitsu has pretty good stats.
Only level 1 (and a 14 year old Ronin at that) but Mutsu Munemitsu is a potential Kaientai member, so first priority was finding him and recruiting him. Of course the four pages' worth of NPCs wandering Kyoto could be in any of its 16 screens, so finding him would be easier said than done.

After over a week of blundering around the city, I still hadn't found him, though while paging through information I did make an unpleasant discovery--somebody was trying to kill him.

All his bodyguards gone and down to 32 Life--someone had it out for Munemitsu.
I don't know whether or not Munemitsu just managed to escape or kill his would-be assassin, but I eventually found him, at death's door. Of course being at death's door meant that he was much easier to persuade as he ran out of energy very quickly. But he was also very strongly in the joi faction so before I could do anything I had to change his tune there.

Debating tired people is like shooting fish in a barrel.
It took me a couple of days, but I got Munemitsu to switch sides, and then join me. Three Kaientai members down, two to go.

Mutsu Munemitsu was a friend of Sakamoto Ryoma who joined the Kaientai in 1867, shortly before the latter was assassinated. After Ryoma was assassinated, Munemitsu led an abortive revenge attempt against Miura Kyutaro, a suspect in his murder, only to be repelled by a shinsengumi (a pro-bakufu special police force) unit that was guarding him. Post-Meiji Restoration, he went on to become a prominent government official and diplomat in the Meiji government.

After joining me Munemitsu was gravely injured so I sent him to the nearest restaurant to eat and slowly get his maximum life back up. He gained a few Appeal points in the process--sometimes when you eat your character will randomly say "keep the change" and get a minor Appeal boost.

Oddly enough, at the same time, Inaba Masakuni, who I had unsuccessfully attempted to persuade outside of Edo, had somehow tracked Ryoma down to Kyoto--and this time wanted to persuade him. Apparently Ryoma's level (now 21) was high enough that he could debate Masakuni without the latter going ballistic. After a few turns I managed to turn Masakuni--and the Yodo han--to kogi. I was also going to try to recruit him, but some random bushi decided to accost Ryoma and I ran out of life debating him, allowing Masakuni to leave before I could chase him down.

Meanwhile Kenkichi was having a rough time of it in Edo, with random priests attacking him out of nowhere.

Some unusual generic NPCs like priests and women solely exist for sparking events where you get attacked. 
Around this time, on April 22, I got a history note that Ii Naosuke, (one of the playable sabaku characters for this scenario) got promoted to the rank of tairo, the right-hand man to the Shogun himself. This is a big deal, as it kicks off a series of fairly major events in the first scenario if you can't either kill or convert Naosuke first. I would have loved to be able to do that as Ii Naosuke is a great character, but odds of my even finding him, let alone converting him, before events transpire, were slight at best.

Masakuni had left Kyoto so I had Ryoma try to hunt him down. My first thought was that his "mission" of sorts was to convert Ryoma so failing that, he might have returned to his home castle in Yodo. And it turns out that's exactly what he did. After a few days of Trust debating Ryoma recruited him.


These stats are...not good.
Yodo is a pretty crappy han. It's really poor in resources and development. However I now had control of it, so would be able to develop it eventually. Masakuni himself gets to use the facilities of the Ooku (大奥), or harem of the castle while he's there. Technically only the Shogun himself got an Ooku but whatever. The commands of the Ooku are "Poetry," "Study," "Kendo," "Tea," and "Duty" (that last one is to "employ" the services of a harem member, though you can get rejected) which will allow you to attempt to improve your stats for free. Also apparently the Yodo army was mucking about in Shinano for some reason, so I turned on its AI to order it to go home.

I decided to head back to Edo to regroup the whole team and move together, only realizing too late (because I wasn't paying attention) that Osaka's port doesn't lead back to Edo, but to Shimonoseki on the extreme west coast of Honshu.

I also discovered that for some reason, I had lost control of Kondo Chojiro and Nagaoka Kenkichi! Sometimes this happens in Ishin no Arashi and I have no idea why. Occasionally when you recruit a new character you'll lose control of an old one. It can be when you have 3 controllable PCs or 20. It doesn't make a lot of sense. So now in order to found the Kaientai I'd have to find both of them.

Meanwhile it was the end of April, and now that I had a han under my control, I could make decisions about governing it.

The governing options are "administration," "personnel" and "military"
Governing a han is relatively simple in strategy game terms. You have money and food (金米) which is like a generic "money" resource, and kokudaka (石高) which is a measure of income that comes in twice a year. Then there's public opinion (民情) and flood control (治水), number of guns (銃) and number of soldiers and their training (訓練) level.

Improving any of these numbers except soldier training level costs money, and the threadbare manual that came with the re-release doesn't describe what any of these do. My guess is that when public opinion is low there's a greater chance for revolt and flood control reduces typhoon damage. I spent most of my money improving kokudaka and public opinion, and then trained my two armies. (You get two armies--the first always guards the castle and the second can be sent out)

Another thing you can do when governing a han is make personnel changes; promoting and demoting hanshi, jushin, and karo from the han. This can be useful--if I was controlling Tosa, for example, I could theoretically promote Ryoma from hanshi all the way to karo, which would give him an edge in debate. However Yodo, being a low-beans han, has nobody to promote or demote, so there was very little I could do here overall.

After the beginning of the month I wasn't in a great place with Ryoma and Masakuni, so I had them sail from Shimonoseki to Kyushu, since checking my maps it looked like there's a ferry from Nagasaki to close to Edo, where I last saw my lost allies.

Sea and land routes are..interesting. And no I don't know how there are land routes from Kyushu to Honshu.
While at Nagasaki, I found someone I had been looking for--Ike Kurata, one of the characters I need for the Kaientai. However for whatever reason he was holed up inside a brothel and refused to come out, so I couldn't debate him. I had Ryoma and Masakuni camp outside to wait for him to leave, recruiting whatever generic NPCs happened to wander by.

No recruiting foreigners, I guess.
Meanwhile a massive, well-trained army from Choshu, 6000 men strong, decided to attack my piddly little castle at Yodo.

These are...not good odds.
This is a good time to explain army battles. Each han generally has two units associated with it. Unit 1, has to stay put at the castle. If Unit 1 is defeated then so goes the castle, generally. Unit 2 is the field unit and can go anywhere. There's also sometimes a unit of goshi (郷士) that acts like a reserve Unit 2 but can't be controlled.

My full army of 2600 was no match for Choshu's army, so I had to resort to somewhat exploity and unconventional tactics. To do this, I made sure that I directly controlled all of the battles, as I was doomed for sure if I let the computer take care of everything.

Even if you play perfectly in the action-battle minigame and never take a hit, you're still going to lose soldiers--the life bars on both sides slowly drain based on the opposing unit's Attack power (the red bar) and whether or not the unit is stationed in a castle.

However you can't win or lose a battle based on this gradual attrition alone. The final blow has to come from one sprite smacking the other with his sword. So the general strategy when grossly outnumbered is to play as defensively as possible, maybe getting in a couple of hits per fight, then fleeing with the Return key once possible. Eventually you'll be drained down to 1 soldier, but so long as he doesn't get killed with a sword strike you can go on like this indefinitely. It's tedious to say the least.

But in this case it worked, and I managed to fight off all 6000 troops. I had less than 400 soldiers combined by the time the dust had cleared, but the han was still under my control--though it was so weakened that it seemed like easy pickings for anyone.

In the final battle, my one lone soldier in unit 2 killed 205 enemy soldiers single-handedly.

The battle for Yodo was complete (at least until some other opportunistic army steamrolled it) and after a month Ike Kurata was still inside that stupid brothel so I gave up. I left Masakuni outside of Nagasaki to wait for him just in case, but I had Ryoma head out and make better use of his time.

It didn't work out so well. Ryoma went back to Edo, and Kenkichi and Chojiro had already cleared out. Checking my Trust levels I had zero for Kenkichi too, so either he got converted or killed off-screen. Meanwhile Ike Kurata left the brothel and somehow slipped through Masakuni's fingers. So I sent Masakuni back to Kyoto, where he teamed up with Munemitsu. And the Harris Treaty was signed in the duration.

The treaty is signed--the Emperor's opinion didn't count for much!

My new goal for Masakuni and Munemitsu's  was to convert as many regional hans as possible to kogi, whether or not they were yuhans. All the hans in the area smelled blood in the water and were mobbing Yodo attempting to conquer it--by converting local hans I'd reduce the pressure just a little.

Every one of these armies is out for Yodo's blood.
Speaking of those armies, using the "super-soldier" trick/exploit I was able to fend them off, and was getting pretty good at the fighting mini-game. By the end of June my lone soldier holed up in Yodo castle had killed over 10,000 enemy troops like some sort of character from a Musou game. It was tedious to the point that I wanted to just let them kill my soldier and be done with it, but then Masakuni would be demoted to the rank of Ronin and lose a lot of his edge in debate.

Still, things weren't going so hot overall. I'd lost two of my three Kaientai members, hadn't converted a single yuhan, and the one han I did have control of was getting swarmed by enemies. Next post I'll try to get my act together and actually accomplish something notable.

Ishin no Arashi: Endgame

January 1st of 1859 I had just converted Satsuma and all provinces of Kyushu but one, a Bakufu province, were kogi.  I had planned to start ...