Inaba Masakuni was lord of the Yodo han and later an official in Meiji Japan. He's mostly famous for refusing entry of the fleeing bakufu army at the battle of Toba-Fushimi during the Boshin war, helping turn the tide toward the imperial forces. However what's interesting is that despite that, he was actually a strong proponent of the shogun and wanted to side with him, but was opposed by his own court. Though Yodo defected to the imperial side, Masakuni didn't really want to.
 |
| This didn't turn out like I'd expect.. |
Rather than stick around, Ryoma took a nearby boat to Osaka. Osaka was dead empty so I decided to go to Kyoto instead. Kyoto is second only to Edo in terms of its activity.
Meanwhile I decided to do something about Kenkichi's anemic Appeal stat--I sent him to the brothel.
 |
| I lucked out this time--this event gives you a few extra Appeal points. |
On the way to Kyoto, there was an obstacle--a checkpoint.
 |
| Checkpoints are usually also at chokepoints--in this case, blocking a river crossing. |
Reaching Kyoto itself, it was now April 1st, and "summer" by Ishin no Arashi's standards. It doesn't make a huge difference, but every season the background music changes. I also made a discovery--Mutsu Munemitsu was there somewhere.
 |
| His Military is a little low, but otherwise Munemitsu has pretty good stats. |
After over a week of blundering around the city, I still hadn't found him, though while paging through information I did make an unpleasant discovery--somebody was trying to kill him.
 |
| All his bodyguards gone and down to 32 Life--someone had it out for Munemitsu. |
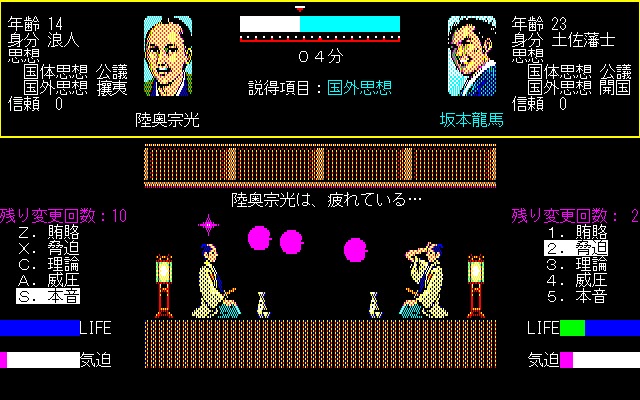 |
| Debating tired people is like shooting fish in a barrel. |
Mutsu Munemitsu was a friend of Sakamoto Ryoma who joined the Kaientai in 1867, shortly before the latter was assassinated. After Ryoma was assassinated, Munemitsu led an abortive revenge attempt against Miura Kyutaro, a suspect in his murder, only to be repelled by a shinsengumi (a pro-bakufu special police force) unit that was guarding him. Post-Meiji Restoration, he went on to become a prominent government official and diplomat in the Meiji government.
After joining me Munemitsu was gravely injured so I sent him to the nearest restaurant to eat and slowly get his maximum life back up. He gained a few Appeal points in the process--sometimes when you eat your character will randomly say "keep the change" and get a minor Appeal boost.
Oddly enough, at the same time, Inaba Masakuni, who I had unsuccessfully attempted to persuade outside of Edo, had somehow tracked Ryoma down to Kyoto--and this time wanted to persuade him. Apparently Ryoma's level (now 21) was high enough that he could debate Masakuni without the latter going ballistic. After a few turns I managed to turn Masakuni--and the Yodo han--to kogi. I was also going to try to recruit him, but some random bushi decided to accost Ryoma and I ran out of life debating him, allowing Masakuni to leave before I could chase him down.
Meanwhile Kenkichi was having a rough time of it in Edo, with random priests attacking him out of nowhere.
 |
| Some unusual generic NPCs like priests and women solely exist for sparking events where you get attacked. |
Masakuni had left Kyoto so I had Ryoma try to hunt him down. My first thought was that his "mission" of sorts was to convert Ryoma so failing that, he might have returned to his home castle in Yodo. And it turns out that's exactly what he did. After a few days of Trust debating Ryoma recruited him.
 |
| These stats are...not good. |
I decided to head back to Edo to regroup the whole team and move together, only realizing too late (because I wasn't paying attention) that Osaka's port doesn't lead back to Edo, but to Shimonoseki on the extreme west coast of Honshu.
I also discovered that for some reason, I had lost control of Kondo Chojiro and Nagaoka Kenkichi! Sometimes this happens in Ishin no Arashi and I have no idea why. Occasionally when you recruit a new character you'll lose control of an old one. It can be when you have 3 controllable PCs or 20. It doesn't make a lot of sense. So now in order to found the Kaientai I'd have to find both of them.
Meanwhile it was the end of April, and now that I had a han under my control, I could make decisions about governing it.
 |
| The governing options are "administration," "personnel" and "military" |
Improving any of these numbers except soldier training level costs money, and the threadbare manual that came with the re-release doesn't describe what any of these do. My guess is that when public opinion is low there's a greater chance for revolt and flood control reduces typhoon damage. I spent most of my money improving kokudaka and public opinion, and then trained my two armies. (You get two armies--the first always guards the castle and the second can be sent out)
Another thing you can do when governing a han is make personnel changes; promoting and demoting hanshi, jushin, and karo from the han. This can be useful--if I was controlling Tosa, for example, I could theoretically promote Ryoma from hanshi all the way to karo, which would give him an edge in debate. However Yodo, being a low-beans han, has nobody to promote or demote, so there was very little I could do here overall.
After the beginning of the month I wasn't in a great place with Ryoma and Masakuni, so I had them sail from Shimonoseki to Kyushu, since checking my maps it looked like there's a ferry from Nagasaki to close to Edo, where I last saw my lost allies.
 |
| Sea and land routes are..interesting. And no I don't know how there are land routes from Kyushu to Honshu. |
 |
| No recruiting foreigners, I guess. |
 |
| These are...not good odds. |
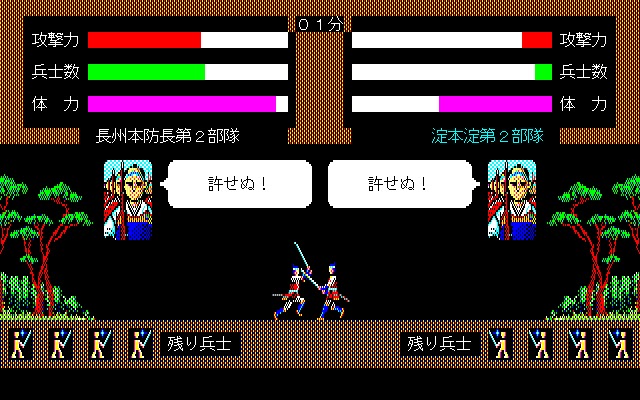
This is a good time to explain army battles. Each han generally has two units associated with it. Unit 1, has to stay put at the castle. If Unit 1 is defeated then so goes the castle, generally. Unit 2 is the field unit and can go anywhere. There's also sometimes a unit of goshi (郷士) that acts like a reserve Unit 2 but can't be controlled.
My full army of 2600 was no match for Choshu's army, so I had to resort to somewhat exploity and unconventional tactics. To do this, I made sure that I directly controlled all of the battles, as I was doomed for sure if I let the computer take care of everything.
Even if you play perfectly in the action-battle minigame and never take a hit, you're still going to lose soldiers--the life bars on both sides slowly drain based on the opposing unit's Attack power (the red bar) and whether or not the unit is stationed in a castle.
However you can't win or lose a battle based on this gradual attrition alone. The final blow has to come from one sprite smacking the other with his sword. So the general strategy when grossly outnumbered is to play as defensively as possible, maybe getting in a couple of hits per fight, then fleeing with the Return key once possible. Eventually you'll be drained down to 1 soldier, but so long as he doesn't get killed with a sword strike you can go on like this indefinitely. It's tedious to say the least.
But in this case it worked, and I managed to fight off all 6000 troops. I had less than 400 soldiers combined by the time the dust had cleared, but the han was still under my control--though it was so weakened that it seemed like easy pickings for anyone.
 |
| In the final battle, my one lone soldier in unit 2 killed 205 enemy soldiers single-handedly. |
The battle for Yodo was complete (at least until some other opportunistic army steamrolled it) and after a month Ike Kurata was still inside that stupid brothel so I gave up. I left Masakuni outside of Nagasaki to wait for him just in case, but I had Ryoma head out and make better use of his time.
It didn't work out so well. Ryoma went back to Edo, and Kenkichi and Chojiro had already cleared out. Checking my Trust levels I had zero for Kenkichi too, so either he got converted or killed off-screen. Meanwhile Ike Kurata left the brothel and somehow slipped through Masakuni's fingers. So I sent Masakuni back to Kyoto, where he teamed up with Munemitsu. And the Harris Treaty was signed in the duration.
 |
| The treaty is signed--the Emperor's opinion didn't count for much! |
My new goal for Masakuni and Munemitsu's was to convert as many regional hans as possible to kogi, whether or not they were yuhans. All the hans in the area smelled blood in the water and were mobbing Yodo attempting to conquer it--by converting local hans I'd reduce the pressure just a little.
 |
| Every one of these armies is out for Yodo's blood. |
Still, things weren't going so hot overall. I'd lost two of my three Kaientai members, hadn't converted a single yuhan, and the one han I did have control of was getting swarmed by enemies. Next post I'll try to get my act together and actually accomplish something notable.


Ouch! It sounds like leaving important but squishy characters under AI control has bitten you in the back. I hope you can recover from these setbacks.
ReplyDeleteYou probably understand the mechanics of these games better than I do, but the impression I always got with the Koei strategy games was that the AI "cheated" on the math (i.e. it got a bigger numeric effect performing the same command with the same stats than you would doing it manually) but it was so stupid that it was only safe to turn on the AI for provinces behind your front lines, without any hostile neighbours. Except for games like Bandit Kings of Ancient China (Suikoden) and the Genghis Khan series where you *couldn't* manually control provinces other than the one your main character was in.
The Koei game with the worst AI that I've played is Gemfire (Royal Blood), where the enemy units in combat frequently turned their back on you (exposing themselves to devastating flanking attacks) to destroy some random barricade that wasn't even in their way. Sometimes the computer would even make one unit put up a barricade and the next unit to move destroy it in the same turn. The Gemfire AI was so stupid that it was almost difficult not to win the game in the first 3 or 4 game years. I understand Gemfire was designed to be an introductory game to draw the Dragon Quest/Final Fantasy audience into the strategy genre, but even so...
It's actually not that bad really. It turns out that they got converted, which isn't that surprising since their Appeal stat was low, and that seems to be weighted higher than Level when the AI controls things, even though Level is more important under direct control.
ReplyDeleteOverall the AI in Ishin no Arashi isn't amazing--after all it is running on a very old system--but it's not terrible either. It feels balanced because there are always plenty of AI characters on your "side" and they all fall under the same rules as AI "enemies." It's not as bad as a lot of older Koei games in that respect.